Installation Tips for Installing a Snow Melting System in Concrete (Quick Reference Guide – Article 2 in a Series of 3)
Remember to check the element resistance and the insulation resistance of the heating cable/mat at the recommended intervals:
- In the box: Write the values on the warranty card.
- After being laid out: Write the values on the warranty card.
- After being covered: Write the values on the warranty card.
- Record your readings in the installation manual.
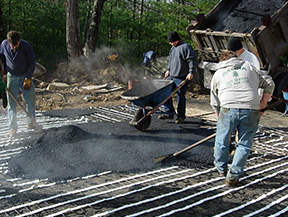
- Ensure that all sharp stones and debris are removed from the area where the heating cable will be installed.
- Place the remesh in preparation of the concrete pour.
- Lay the cables/mats according to the plan and fasten them to the remesh or rebar (using plastic zip-lock ties) so that they do not move during the concrete pouring.
- Do NOT allow heating cables to touch, cross, overlap or get bunched up.

- Do NOT cut or alter the heating cable. Mat tape may be cut, but the heating cable must never be cut. View the video How to Make Turns with mats.
- Heating cable/mats should be spaced at no less than 2-inches center-to-center and no more than 4-inches center-to-center. This also applies to adjacent heating mats.
- Secure the heating cable to the wire mesh or grid using plastic zip ties. Make sure that the cable/mats and the wire mesh are secure so that they will not move or shift when the concrete is being poured.
- The heating cable will need to be positioned 2-inches from the surface of the concrete. Use wire remesh and Mesh-Ups or concrete dobies/chairs to position the heating cable within 2-inches of the surface. The heating cable/mat should never rest on the ground.

- Do not allow heating cable to cross an expansion joint. Control joints are allowable under the following conditions:
- The joint is tooled or cut NO deeper than 1¼-inches.
- A 6-inch piece of ¼-inch angle iron is recommended to protect the cable any place where a control joint will pass over it. The heating cable is tightly strapped to the angle iron with plastic zip ties.
- Mark the forms where the angle irons are located to accurately place the control joints.
- The cable must be ¾ to 1-inch below the bottom of the joint. (Do NOT tool joints deeper than 1½ inches. Stay above heating cables.)
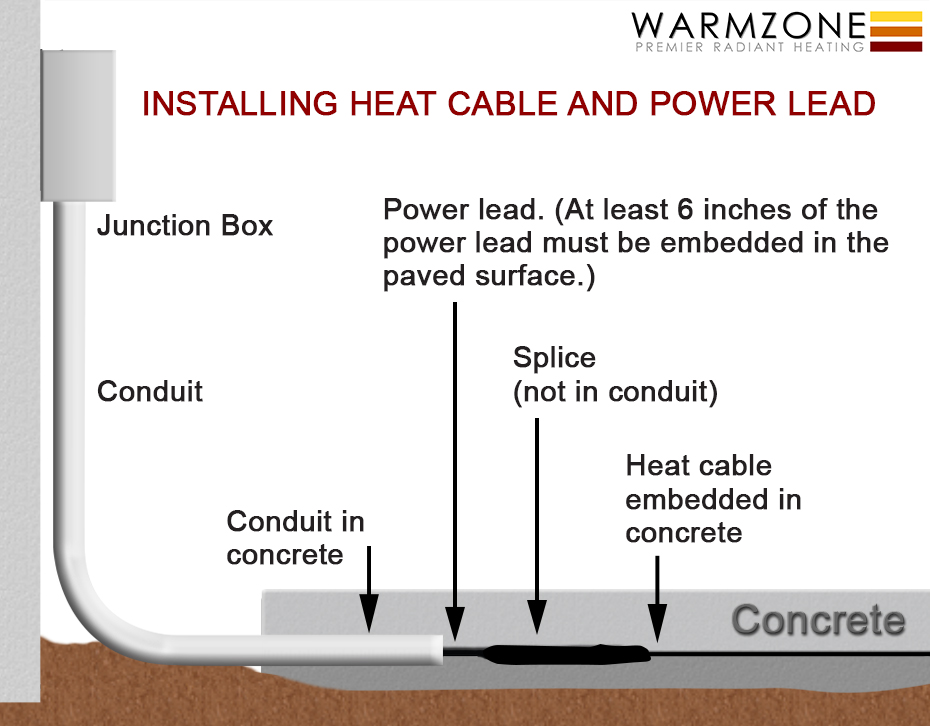
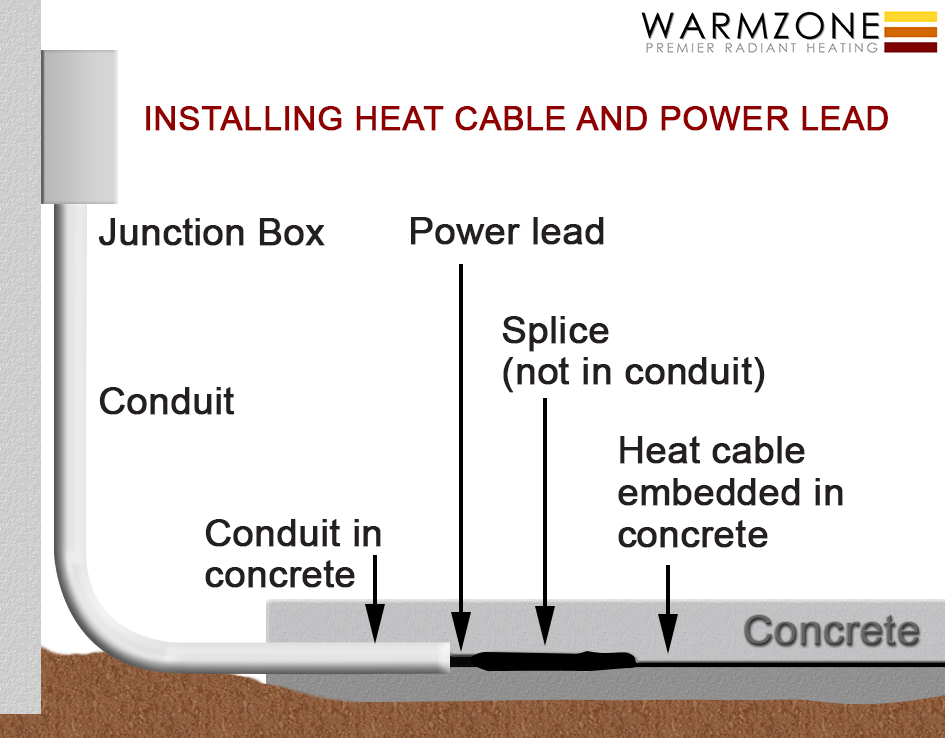
- Embed all of the heating cable and the splice. The cold lead on the heat cable and mats is not rated for direct burial in earth and must be run through a conduit. (The first 6-inches of the cold lead and splice must be embedded in the heated surface.) See the illustration showing the installation of the heat cable and power lead.
- Handle heating cables carefully. Use extreme care with tools such as shovels, rakes and wheel barrels to avoid damaging the cables.
- Verify cable integrity by checking resistance often during installation.
- It is important that wiring of the system is completed by a licensed and qualified electrician and in accordance with local laws, codes, regulations, and NEC guidelines.
* These tips are meant for quick reference. It is NOT a substitution for proper training and following the installation manual. Always read and follow the installation manual. Web-based training is available on request.
View Warmzone installation videos.


