Category Archives: Articles

Sergeant Burr and the Snow Brigade

The Battle of Radiant Ridge. The Snow Brigade Takes on the Heated Driveway Fortress

A thick cloud of white specs began falling from the grey sky. “Alright, you snowflakes!” the gruff sergeant bellowed. “Listen up! We’ve got a job to do and we’re gonna do it!” Sergeant Burr studied the troops as they drifted down in the cold breeze.

“Our mission is to harass those two-legged monstrosities down there and bring their travel plans to a halt. Got that? We are to secure the driveway and keep them confined to their house. Make all exit points dangerous and impassible. We will impede all manner of travel, whether it’s by foot or vehicle. Do you understand?”

“Sir, yes sir!” the group yelled in unison.

“Alright then, when you land on that driveway tighten up your ranks and hold your ground. I’ll be taking the high ground by the wintergreen pansies to supervise the operation. I’ll be there with you guys, fighting alongside you.”

Sergeant Burr, snowflake leader.
Sergeant Burr, leader of the Snowflake Battalion.


“Um Sergeant Burr, sir?” one timid private stepped forward.

“What’s on your mind, son?”

“Uh, yes sir, I uh, I heard that some of these places are installing heated driveways that pretty much vaporize entire battalions of snowflakes like us. How do we know they don’t have any weapons of mass melting down there?”

“Because our intelligence reports didn’t say anything about radiant heat!” the sergeant yelled. “Look down there! That driveway and sidewalk look the same as all the others, right? Now, enough with those crazy thoughts.”

“Um, yes sir.”

“Alright! So stop worrying. We’re going to use the element of surprise and bury ‘em before they can yell ‘Grandma busted her hip’. Got that?”

“Yeh-yes sir,” the snowflake sheepishly resigned and slipped back into rank.

“Dude,” a soldier next to him nudged. “Ya just gotta think positive man. Like, picture in your mind that the driveway down there is totally chill, man. It’s just a frigid slab of cement waiting for us ice-cool dudes to drift on down and cover up. Positive thinking man; just use the power of positive thinking. Believe it will be ice cold and it will be ice cold.”

“Well okay, sure,” the wary private said with a raised eyebrow, while distancing himself from the soldier.

“The rest of you snowflakes,” Sergeant Burr continued, “stop worrying about the radiant heat bogeyman and focus on your assignments. The first wave is to cover the surface. Link up and provide a thin sheet of ice so the next waves can pile on top to pack you down and hide you. You’ll be the tip of the spear; the secret slick surface that will bring down any of those two-legged mammals who dare to step outside.”

“What about the four-legged ones?” a soldier asked.

“We don’t care about them. They don’t have as far to go when they drop. It’s those bipedal ones that are a lot more fun to watch when they go down,” the sergeant said with a devilish grin. “Now let’s go down there and have some fun.”

The group descended closer and closer to the ground. The brown lawns and leafless trees were beginning to be overcome by the white army. In fact, the entire landscape was sinking slowly under a blanket of snow, but the driveway remained defiant. It stood alone in the drowning neighborhood.

“Man, I don’t like the looks of this,” the timid private said to a fellow paratrooper.

“Yeah,” came the reply. “That doesn’t look right.”

“No talking in the ranks!” the sergeant howled. He raised his hand slowly and then threw it down to his side. “First wave, hit the ground! Go, go, go!”

The blanket of snowflakes fell onto the concrete, but shrieks and screams filled the air. The snowflakes were gone. They disappeared. One after another the snowflakes hit the pavement before letting out a yelp and trickling away. The snow was disarmed, turning into little droplets that drained down the driveway and into the gutter.

The young private was now nothing more than a small drop of water. He recognized the droplet next to him and gave him a shove. “Positive thinking, aye? Just think it will be ice cold and it will be ice cold, aye? Rrright. Positive thinking, my lily white icicle!”

“Yeah man. Like, total bummer,” came the sheepish reply.

But some of the first snowflakes to hit the driveway didn’t even make it to the water stage. Like the private said, the snowflakes were vaporized, where they drifted slowly back up to the sky.

“C’mon!” the stubborn sergeant hollered. “Waves two and three. Hit ‘em hard!”

But with each company of snowflakes the results were the same. The icy soldiers were nullified the second they hit the ground.

“Sarge!” a platoon leader yelled. “We can’t break through. It’s too hot down there. The driveway is fortified with radiant heat! We don’t stand a chance.”

The stubborn Sergeant only grew more desperate. “We . . . we gotta. Um,” he stammered and thought for a moment. Maybe it’s not a Warmzone heated driveway. Maybe we can overwhelm it.

“Everybody! he yelled. “We need a full frontal assault. We’ll overwhelm the driveway with sheer numbers!”

“But Sarge!”

“That’s an order,” the sergeant screamed. “Everyone to the driveway! It’s our only chance.” He called for reinforcements.

The sky grew white and thick sheets of snow descended. Snowflake after snowflake hit the ground, but no one could establish a foothold. It was impossible. Even when reinforcements that doubled the size of the assault force arrived, they could make no headway. Snow piled up on the ground next to the driveway, but the troops on the lawn could only watch in horror as their comrades fell to their doom.

Heated driveway and sidewalk
 The scene of the great snowflake massacre at Radiant Ridge; also referred to as Burr’s Last Stand.

“It’s a massacre,” one resigned.

Still the sergeant continued to bark his attack orders.

“That dude’s a lunatic,” a snowflake on the edge of the driveway remarked as he watched the sergeant scream his orders.

“He’s a cold-hearted dude,” a soldier observed.

“Yeah, got ice in his veins,” came a reply. 

“He’s got ice in his brain!” another injected, shaking his head. “There’s nothing you can do against a heated driveway. It’s hopeless!”

“For sure,” the soldiers agreed. “I reckon Sarge’s brain is melting. Poor guy has gone bananas.”

“Yeah, old ‘blood and guts’ is just ‘old drooling sludge,’.”

“Well, I’m just glad we landed here on the grass. Those heated driveways are murder on snow.”

The battle raged for over two hours, but when the final troops descended from the sky, the driveway and front sidewalk were completely dry. There was no trace of a battle. The army of snow successfully buried the surrounding yards, roads and roofs, but the pavement remained clear.

Sergeant Burr hugged his knees and rocked back and forth. His eyes stared blankly ahead as he repeated, “It’s a heated driveway. How could I know? It’s a heated driveway . . . ”

His soldiers tried to console him, but it was hopeless.

“C’mon Sarge,” the medics lifted him onto a stretcher. “It’s all over now.”

Heated Driveways can be a Reality for Most Homeowners

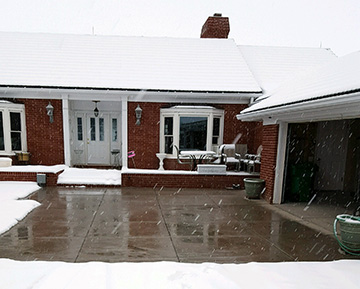
Explore the Many Options for Heating Your Driveway

For some homeowners who are considering the installation of a heated driveway, discovering the initial price of a snow melting system can be like getting hit in the face by an errant snowball. The immediate response is to retreat to the garage and embrace the snow shovel with renewed, yet reluctant affection and appreciation. Unaware of the many custom – and affordable – driveway heating options that can accommodate a vast range of budgets and layouts, many consumers unknowingly close the door of possibility and relegate themselves (and their families) to a future of manual snow removal.

A heated driveway system in concrete operating during a snowstorm.

In truth, no two heated driveways are alike, as every system is customized according to the specific demands of the homeowner. Each system is not only designed for the specific layout of each driveway, but other factors are considered as well. In addition to the budget, driveway heating systems are also designed according to ASHRAE standards.

The American Society of Heating, Refrigerating and Air-Conditioning Engineers (ASHRAE) is an organization committed to advancing the arts and sciences of heating, ventilating, air conditioning and refrigerating to serve humanity and promote a sustainable world.

Snow melting system requirements vary, depending on the specifics of the project. ASHRAE standards were established to address variances such as the location’s altitude, average snowfall and temperature, etc., to allow designers to optimize each system’s performance for that particular location. Basically, if you want the best snow melting system, it’s a good idea to choose a radiant heat solutions provider that adheres to ASHRAE Standards.

To ensure the best snow melting system for your needs, it’s vital that your radiant heat provider design a custom system in accordance with ASHRAE Standards. This ensures that every system best meets the specific needs of each customer. Adhering to these standards means breaking down the design of the system regionally. This entails careful research of the weather for the region, including the general climate, average snowfall, storm duration, temperatures, and other important factors to ensure that the system’s components and design is going to be best suited to perform ideally in that particular location.

While the price of a heated driveway can often be rationalized by the added convenience and time-saving features – or money saved from paying for manual snow removal – perhaps the real benefit of a heated driveway is added safety.

“It’s a classic example of how you can’t put a price tag on peace of mind,” says Alex Geier, of Hinsdale, Illinois (quoted by the Calgary Herald). Safety is likely the single greatest benefit of a heated driveway system.

Asphalt driveway with heated tire tracks

You also don’t have to heat the entire driveway. Many choose to only heat an 8-foot wide strip up the middle of a driveway, or two 24-inch tire tracks. The options and custom layouts are endless, and so many things can be done to accommodate the budget – without affecting performance.

Snow melting systems can be further customized to accommodate the available power. And don’t worry. You don’t need to be solely responsible for determining the available power of your home. Ultimately it is the electrician who determines this. However, there are some helpful guidelines that may assist you as you work with radiant heat professionals to determine the best snow melting solution.

One 30-amp breaker supplies enough power to heat a 170-square foot area. To heat a driveway of 350-square feet, two 30-amp breakers (or one 60-amp breaker) is needed. You can check your home’s main breaker panel to see the power coming into the house. (Most residences feature either two 100-amp panels or two 200-amp breakers. These are located at the top of the main breaker box, above the main breaker panel.)

If you have limited power there are still options that would allow you to install a heated driveway. Customers with minimal power have installed heated driveways that rely on zoning. This means that only one section of the driveway heats up at a time. For example, if there are three zones, then zone one will first activate. After it clears the area, zone two will then power up, followed by zone three. Certainly this is not as ideal as heating a driveway all at once, but for those with power constraints, this is a viable option. Regardless of your situation and budget, chances are that there is a custom driveway heating solution that will fit your needs.

Call Warmzone for more information (888.488.9276), or visit us online at www.warmzone.com.

Snow Melting Systems: Where do you Start?

Tips for Those Considering Radiant Heat

Purchasing a snow melting system like the ClearZone system offered at Warmzone is a great way to eliminate manual labor and make your home or business safer, but the process of finding, purchasing, and installing a system can seem complicated to any buyer. There are quite a few questions that can slow the purchasing and installation process. What products best suit my needs?  How much power is required? How is my system installed? Here is a quick breakdown of the procedure to help you make a confident and informed decision.

One of the first things that needs to be addressed when installing a snow melting system is to determine the square footage of the area to be heated. A rough draft of the area you wish to heat is typically needed to begin the estimate and design of your radiant heat system. If you are unsure of the exact measurements or don’t know how to calculate the square footage of your driveway or area to be heated, contact Warmzone at 888.488.9276. With state-of-the-art software that allows for a satellite view of the property, a qualified Warmzone representative can measure the square footage for your project over the phone. Warmzone also offers professional design services to provide you with a detailed layout of your system. The custom layout takes all factors into consideration, including, the specifics of your property, the climate of your location, average yearly snowfall, and power requirements. Designing a custom system for you ensures that the best solution is provided and makes the installation of the heated driveway you’ve been imagining easy and painless.

Professional design and layout of radiant heated driveway
Example of radiant heated driveway system AutoCAD.

When it comes to power for your radiant heat system, here are few basic guidelines. It is important to verify the existing voltage (110/120 or 220/240) and available amperage. To make certain of your home’s power, we recommend having an electrician come to your location to measure the amperage. However, you can also check your home’s power by accessing your main breaker panel. Most homes are equipped with either two 100 amp panels or one 200 amp panel, which should be located at the top of the main breaker box. When figuring out what power your system may need, consider that one 30 amp breaker will heat about 170 square feet, so a 350-square-foot driveway would require one 60 amp breaker, or two 30 amp breakers. But don’t be intimidated by these details. Warmzone radiant heat experts will assist your electrician at any time to help ensure that all of your project information is correct prior to any installation taking place.

Most homes have more than ample power to operate a heated driveway or sidewalk(s). However, in the unlikely situation that there is limited power available, a technique called zoning can be used.

Zoning allows those with minimal power to still enjoy the benefits of a snow melting system. Your designated snow melting area is divided into zones, each with its own snow sensor. The zones are prioritized by which area must be cleared. Each zone operates separately, utilizing the available power to remove snow and ice from the designated area. This allows the system to optimize the available power. After the first zone is cleared power is sent to the next zone and so on, cycling much like a sprinkler system.

Snow melting system divided into zones for power usage
When faced with a limited power supply, snow melting systems can be installed to heat by zones, shown in this illustration.

At Warmzone, zoning is efficient and cost effective. The smart cycling features allow an area that may already be cleared to be skipped and not activated. Homeowners can also operate the system manually. If you have any questions about power, a Warmzone representative would be happy to assist you and explain your options. To talk with a radiant heat expert, call 888.488.9276.

After verifying the voltage and available amperage of your home or business, you can move forward with the installation. Snow melting systems can be installed in almost any medium, whether it’s asphalt, concrete, or pavers. After choosing and receiving your heating cable and other system components, it’s time to prepare the area for installation. Make sure the area is cleared of any rocks or debris that may damage the heating cable.

With concrete installations, a wire remesh is installed and the heating cable is secured to the mesh to ensure proper cable spacing and prevent shifting during pouring. Next, Mesh-Up plastic supports are installed to prevent the cable from sitting on the ground. Finally, an aerial mount snow sensor is installed, which activates when there is precipitation and temperature drops below the set point (usually 39°F). When installing system components make sure to follow building codes and advised installation methods. You can also check out some basic installation tips here or view some helpful installation videos.

Still have questions about snow melting systems? Take advantage of the many industry leading services available at Warmzone. Professional design and engineering services offered at Warmzone provide customers with product consultation as well as a detailed CAD of their system’s layout. This ensures system performance expectations are met and minimizes installation issues. Free Installation training through Warmzone University is offered online or in person, and free tech support from radiant heat experts and electricians is also available.

Heated paver driveway in operation.
Example of a snow melting system in action.

Check out all the benefits Warmzone can offer by contacting a dedicated professional today at 888.488.9276.

Installation Tips – Installing a Snow Melting System in Asphalt

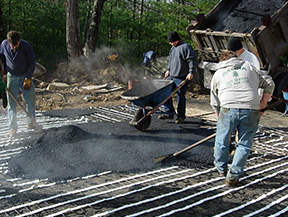
Installation Tips for Installing Snow Melting Heat Cable in Asphalt (Quick Reference Guide – Article 1 in a Series of 3)

Remember to check the element resistance and the insulation resistance of the heating cable/mat at the recommended intervals:

  1. In the box: Write the values on the warranty card.
  2. After being laid out: Write the values on the warranty card.
  3. After being covered: Write the values on the warranty card.
  4. Record your readings in the installation manual.
  • When laying out the cable, DO NOT allow heating cables to touch, cross, overlap or get bunched up. Minimum allowable spacing is 2 inches.
  • Do NOT place asphalt that is higher in temperature than the cable’s maximum rated temperature on the heating cables.
  • Heating cables should be securely fastened so they do not move or shift during the embedment process.

Applying hot asphalt over heat cable mats

  • Do NOT use a track application machine on the asphalt. Rubber tire applicators are okay as long as the asphalt temperature is below the maximum rated temperature for the heating cables.
  • The operating weight of the asphalt roller should not exceed 1,000 pounds. (The heat cable is designed to handle 8.9kN before the insulation is damaged, which will cause the cable to fail.) NOTE: A walk-behind roller imparts a force of between 5-18 kN.
    • Use a small power roller to compact asphalt over cable on sand, concrete, or ½-inch aggregate. A smaller roller will take more time, but decreases the chance of damaging the heating cable.
    • A roller with 30 kN or less is allowable when heating cable is in concrete and the concrete is then covered is asphalt.
    • When compacting/rolling on a grade, do not stop the roller. Stopping and resuming the roller may stretch and break the heat cable.
  • Do NOT dump large quantities of asphalt on small sections of the heating cables. Doing this may cause damage to the cable because of excessive, focused heat. Ideally, the asphalt should be applied by hand.

Installing a heated asphalt driveway

  • Do NOT cut or alter the heating cable. Mat tape may be cut, but the heating cable must never be cut.
  • Embed all of the heating cable and the splice in the asphalt. Allow asphalt to cool to a temperature of approx 212°F (100°C) before applying directly over the cable and splice.

Installing the cable splice in asphalt.

  • Manually lay the asphalt and spread the material evenly around and over the heating cables.
  • Heating cables are normally covered by 2-inches of asphalt. Leave a buffer of 4 to 6 inches of unheated asphalt around the edge of the heated area. This allows for adjustment of paving surface edges without damaging the heating cable.
  • Handle heating cables carefully – use extreme care with tools such as shovels, rakes and wheel barrels to avoid damaging the cables.
  • Verify cable integrity by checking resistance often during installation.
  • It is important that the snow melting system be wired by a licensed, qualified electrician and in accordance with local laws, codes, regulations, and NEC guidelines.
  • Ground sensors/cups should not be exposed to temperatures above 80°C (176°F).
  • A perimeter of a maximum of 12 inches of asphalt should exist around the embedded cables. This allows for adjustment of the paving surface edge without damaging the heating cable.

* This list is intended as a general quick reference guide. It is NOT a substitution for proper training and following the installation manual. Always read and follow the installation manual. Web-based training is available on request.

For more information about installing heated driveways and snow melting systems, visit Warmzone’s Installation Overviews web page. Warmzone also provides a host of radiant heat installation videos online as well. Call us today for more information at 888.488.9276.

Installation Tips – Installing a Snow Melting System in Concrete

Installation Tips for Installing a Snow Melting System in Concrete (Quick Reference Guide – Article 2 in a Series of 3)

Remember to check the element resistance and the insulation resistance of the heating cable/mat at the recommended intervals:

  1. In the box: Write the values on the warranty card.
  2. After being laid out: Write the values on the warranty card.
  3. After being covered: Write the values on the warranty card.
  4. Record your readings in the installation manual.
  • Ensure that all sharp stones and debris are removed from the area where the heating cable will be installed.
  • Place the remesh in preparation of the concrete pour.
  • Lay the cables/mats according to the plan and fasten them to the remesh or rebar (using plastic zip-lock ties) so that they do not move during the concrete pouring.
  • Do NOT allow heating cables to touch, cross, overlap or get bunched up.

wz-sm-Heating_Cable_Tips-Keeping_Your_Cable_Safe thumbnail

  • Do NOT cut or alter the heating cable. Mat tape may be cut, but the heating cable must never be cut. View the video How to Make Turns with mats.
  • Heating cable/mats should be spaced at no less than 2-inches center-to-center and no more than 4-inches center-to-center. This also applies to adjacent heating mats.
  • Secure the heating cable to the wire mesh or grid using plastic zip ties. Make sure that the cable/mats and the wire mesh are secure so that they will not move or shift when the concrete is being poured.
  • The heating cable will need to be positioned 2-inches from the surface of the concrete. Use wire remesh and Mesh-Ups or concrete dobies/chairs to position the heating cable within 2-inches of the surface. The heating cable/mat should never rest on the ground.

Placing Mesh-Ups under cable and remesh

  • Do not allow heating cable to cross an expansion joint. Control joints are allowable under the following conditions:
    • The joint is tooled or cut NO deeper than 1¼-inches.
    • A 6-inch piece of ¼-inch angle iron is recommended to protect the cable any place where a control joint will pass over it. The heating cable is tightly strapped to the angle iron with plastic zip ties.
    • Mark the forms where the angle irons are located to accurately place the control joints.
    • The cable must be ¾ to 1-inch below the bottom of the joint. (Do NOT tool joints deeper than 1½ inches. Stay above heating cables.)
  • Embed all of the heating cable and the splice. The cold lead on the heat cable and mats is not rated for direct burial in earth and must be run through a conduit. (The first 6-inches of the cold lead and splice must be embedded in the heated surface.) See the illustration showing the installation of the heat cable and power lead.
  • Handle heating cables carefully. Use extreme care with tools such as shovels, rakes and wheel barrels to avoid damaging the cables.
  • Verify cable integrity by checking resistance often during installation.
  • It is important that wiring of the system is completed by a licensed and qualified electrician and in accordance with local laws, codes, regulations, and NEC guidelines.

* These tips are meant for quick reference. It is NOT a substitution for proper training and following the installation manual. Always read and follow the installation manual. Web-based training is available on request.

View Warmzone installation videos.

Installation Tips – Installing a Snow Melting System Under Pavers

Installing Heat Cable under Pavers (Quick Reference Guide – Article 3 in a Series of 3)

Remember to check the element resistance and the insulation resistance of the heating cable/mat at the recommended intervals:

  1. In the box: Write the values on the warranty card.
  2. After being laid out: Write the values on the warranty card.
  3. After being covered: Write the values on the warranty card.
  4. Record your readings in the installation manual.

When laying out the cable, DO NOT allow heating cables to touch, cross, overlap or get bunched up. Minimum allowable spacing is 2 inches.

Begin installation as close as possible to the electrical source.

Heated driveway with brick pavers

DO NOT cut or alter the heating cable. The white binding tape of heating mats may be cut in order to make turns with the mats, but the heat cable must never be cut or altered.

ClearZone heating cable in mat and rolled.

To secure the cable, lay down a piece of thin wire mesh that fits the area to be heated. The wire mesh should be secured to the ground (with landscaping staples or pins) so it will not move during the embedment process.

Roll out the heating cable or mat and secure it to the wire mesh or grid using plastic zip ties. Heating cables should be securely fastened so they do not move or shift during embedment.

Heating cable should be spaced at no less than 2-inches center-to-center and no more than 4-inches center-to-center. This also applies to the cables in adjacent heating mats.

Contact paver or block manufacturer for total sand or dust depth needed for proper paver/block installation.

Sideview of heat cable installed under pavers

Embed all of the heating cable and the splice in a minimum of 1-inch (½-inch above and ½-inch below) of compacted material such as paver sand or stone dust. Cable and splice must be completely embedded. No air gaps around the cable or splice are allowable. Gauge of paver sand, stone dust or base material must be fine enough to completely encapsulate cable.

Do NOT drop pavers directly on the cable. (This can damage the cable insulation.)  If this occurs, stop installation and check cable integrity via ohm reading.

Handle heating cables carefully – use extreme care with tools such as shovels, rakes and wheel barrels to avoid damaging the cables.

Verify cable integrity by checking resistance often during installation.

It is important that this equipment be installed by a licensed and qualified electrician and in accordance with local laws, codes, regulation and in accordance with NEC guidelines.

If installing in permeable pavers or with pavers or blocks greater than 3-inches thick, contact Warmzone BEFORE installing.

* This list is intended as a general quick reference guide. It is NOT a substitution for proper training and following the installation manual. Always read and follow the installation manual. Web-based training is available on request.

Heated paver walkway

For more information about installing heated driveways and paver snowmelt systems, visit Warmzone’s Installation Overviews web page. Warmzone also provides a host of radiant heat installation videos online as well. Call us today for more information at 888.488.9276.

Hydronic or Electric Radiant Heat?

Choosing the Best Radiant Heating System for Your Needs

Radiant heat systems are a great way to make your life at home or work safer, more comfortable, and simpler. They can be installed under a wide variety of interior surfaces, as well as exterior applications such as walkways, stairs, ramps, and driveways. When considering radiant heat, making the decision between an electric system or a hydronic system can often be daunting. Both types of heating systems have advantages, but it is important to have all the information you need before deciding which is best for your home or business.

Hydronic Radiant Heat

A hydronic radiant heat system is complex and requires many different components. Hydronic floor heating systems work by heating specially treated water and pumping it through flexible PEX tubing embedded under the surface. These systems use a gas or oil burning water heater (boiler) to heat the water, which is then circulated through the manifold and tubing by electric pumps. At Warmzone, only the most efficient condensing boilers and industry leading components are used when installing a hydronic system. Because of the various components and complexity of hydronic systems, the installation costs tend to be notably higher than those of electric systems.

Hydronic snow melting systems also utilize the combination of water and propylene glycol (anti freeze) that is heated and circulated through a closed loop of PEX tubing. In addition to the liquid retaining heat for a time after the system has been shut down, the condensing boiler can be run by almost any energy source. As a result, hydronic systems may boast lower operating costs than those of similarly sized electric systems. This makes hydronic systems a popular choice for large installations.

Fully automated hydronic snow melting systems from Warmzone are controlled by premier components, including an aerial- or pavement-mount snow sensor. These sensors detect precipitation and temperature to activate and shutoff the system as needed.

Electric Radiant Heat

One of the most popular forms of radiant heat used today is electric. An electric radiant heat system works by using a thin resistance electric heating cable that is embedded in the medium, or directly under the flooring. Electric radiant heating can be installed to warm almost any type of flooring in your home; and can even be added to heat existing floors if the floor joists are accessible.

Warmzone floor heating systems are energy efficient and exact, as each separate flooring area/room can be controlled by an individual thermostat. The other advantages of electric radiant heat include easier customization and a more rapid response time when compared to hydronic radiant heat. An electric radiant heating system is much easier to install than a hydronic system, and is commonly used for interior heating applications as well as heated driveways and outdoor applications, including roof deicing.

Heated paver driveway

An electric snow melting system heating a paver driveway.

Electric systems may have an advantage in the outdoors, as they heat rapidly and can more easily prevent buildup of snow or ice. The Clearzone snow melting system is one of the premier driveway heating systems available. It uses a special line voltage cable that produces 35-50 watts per square foot, and is ruggedly designed and constructed to withstand concrete pours and high heat from asphalt installations. Just like the hydronic system, the electric system uses an aerial or an in-ground snow sensor to engage and disengage the system. This system also has no moving parts, so it requires little to no maintenance, and does not require a dedicated space for mechanical components like that of a hydronic system. Electric heat can be a great cost-effective option for driveways. (Refer to our heated driveways web page for general information regarding Calculating a Heated Driveway’s Operating Cost.)

A radiant heating system is a great long-term investment that can increase the resale value of your home and make your business safer and more efficient in harsh winter weather. If you still have questions about radiant heating systems please visit Warmzone.com, or contact a friendly Warmzone professional at 888.488.9276.

Sid the Snowflake gets Caught Behind an Ice Dam

The Adventures of Sid the Snowflake (Trapped Behind an Ice Dam)

Sid tumbled through the sky at the mercy of the wind. One gust sent him hurling up, back toward the gray mist that he’d just departed from, then another would suddenly push him down, spinning him in a different direction. He tried to catch a glimpse of the ground below as he careened through the stormy heavens, but all he could see was a sky full of his fellow snowflakes, all in the same predicament. Not knowing whether he was going to land in the ocean, on solid ground, or on the backside of a cow, Sid was filled with the angst of an uncertain future. A voice suddenly broke his reflective solitude.

“I’ll see you on the ground!” another snowflake yelled to him, seemingly enjoying his carefree flight.

“Alright,” Sid responded with trepidation as he glided closer and closer to earth. “Good luck!”

Illustration of Sid the snowflake for roof de-icing article

Sid knew the chance of seeing this new acquaintance again was slim. Snowflakes that begin their decent together often ended up miles apart by the time they reach the ground. Still, Sid took some comfort in the friendly words and embraced a small sense of reassurance offered by the stranger. Sid was just one of millions who were facing the uncertainty of an unknown destination. This was all part of their cycle of life.

The gusty winds subsided during Sid’s descent, and as visibility increased he could make out forms on the approaching ground. Sid’s last journey took him on an exciting adventure in the Northern Pacific Ocean, and he was half expecting the same. During that adventure, he enjoyed seeing a wide variety of exotic marine life, and he even had the experience of rolling across the back of a small humpback whale.

But today would be much, much different. There was land below. Not only was there land, there were people! Sid was headed for a city. He had fallen into a small town once before, and though the experience wasn’t horrible, it was far from being his favorite. Being scooped up in a shovel and tossed aside to be splattered by dirty, ill-mannered slush from passing cars was something he really hoped he wouldn’t have to endure again.

As he drifted toward the ground, Sid could see that many of his peers had arrived earlier, blanketing the uneven ground and buildings with a pristine layer of white. He plotted his landing and prepared for his arrival in the front yard of a small farm house. But a sudden gust tossed him aside and onto the roof of the house. He breathed a sigh of relief, grateful to be on a roof and not in some cow pasture. He was quickly joined by others, and the group settled in, not yet sure of their fate.

After four uneventful days on the roof, Sid started feeling a bit “loosey goosey” as warm air escaping from the attic warmed the roof and tickled his rear end. He watched as friends around him collapsed from their frozen state into clear liquid, each letting out a loud “whoo hoo” as they tumbled down the roof valley. They zigzagged their way down the giant water slide before crashing into a growing pool that had formed behind a large ridge of ice near the roof’s edge.

Then it was Sid’s turn. As his last frozen foothold gave way, he cascaded toward his friends, clumsily bumping into a few stubborn packs of ice before being released into the small pool. This would be Sid’s new home for a few days. The large ice dam wasn’t going to allow any of them to drip into the gutter or downspout anytime in the near future.

Illustration showing how roof ice dams form

Apparently, the ice dam had been growing long before Sid’s arrival. The shingles were much warmer higher up on the roof, but the surface near the roof’s edge was still cold. The roof extended out from the house, so there was no warm air from the attic.  When drops of melted snow trickled down into the freezing valley below, they collected and then during the cold nights, they transformed back into their frozen state. Without the warmth escaping from the attic as it did near the top of the roof, the frozen water would remain where it was, completely at the mercy of Mother Nature. Here Sid and his drippy friends would dwell until they could find a way past the ice dam. They could only wait for the temperature to slowly warm.

The process of melting and refreezing behind the formidable ice dam had repeated several times before Sid had arrived. And now, trapped behind the ice, Sid and his friends would also take part in that process. As night fell on another cold day, Sid and his companions once again changed back into their frozen state. They could do nothing but wait for warmer weather.

With each passing day, the crowd grew larger as runoff from warm areas of the roof increased the pool’s size. Milling about like restless concert goers awaiting the opening act, some of Sid’s cohorts grew impatient.

“Let’s work our way through this place and drip inside the house,” he heard one say. Soon, a plan was hatched, and an ample collection of rebellious drips began their unconventional trek. Aided by gravity, they wound their way down through a maze of tiny cracks in the roof. If a crack came to an end or became too small, they would wait patiently for the freezing temperature to grant them their super powers. As they transformed into ice, they flexed and expanded with tremendous force, enlarging the existing cracks and preparing a way for them to continue their journey when they resumed their liquid state. With each day and freezing night, the group inched its way through the aging roof. Before long, a trail had been blazed, creating a small stream for others to follow. It didn’t take long for one of the walls in the home to begin absorbing a budding contingent of melted snowflakes. It swelled and warped as more drips piled in.

“Oh man, this drywall stuff is nasty,” one said.

“It’s an acquired taste,” an old timer replied. “Mmm, mmm,” he mumbled as he slithered down the wall.

“Dude,” quipped another, “like, I don’t think this was a good idea. We’re totally gonna end up getting cut outta here and trashed. Man, I don’t want to end up as a stain on a wall. Ugh, not cool, man.”

Sid had no intention of sliding down into the house. The idea of seeping into a home seemed unnatural. Besides, he hated the taste of plaster and drywall, and the last thing he wanted was to become a filament of mildew or mold on a gross, stained wall. He didn’t mind waiting with the others behind the ice dam.

Unfortunately, the homeowner hadn’t installed a roof deicing system, which would have prevented Sid’s derelict friends from becoming troublesome drips and trespassing into the house. Eventually however, the homeowner used a roof rake to chip away at the ice dam.

“Whoa!” Sid observed to a nearby friend as the rake slammed down and scraped the ice. “If he’s not careful, he’s gonna damage the roof shingles and then more of our comrades will seep into his home next time.”

“Eh, whadaya gonna do?” his friend shrugged. “I just wanna blow this popsicle stand. C’mon man, let’s get outta here.”

With the dam broken away, Sid and his friends tumbled into the gutter.  He’d made a journey like this once before, resting on a Utah rooftop for over a week before finding his way back to a stream, and eventually back in to the clouds – where he was happiest. After another epic journey through gutters and drains and streams, Sid finally found himself swaying gently in a small lake.

Later that evening he looked up to the stars that shimmered through the wisps of clouds drifting in the moonlight. “Someday,” he reflected, “I’ll be back up there.” The ice dam held Sid for awhile, but now he was on his way home – he hoped. He floated on his back and stared at the sparkling nighttime sky and promised himself, “Soon I’ll find my way back up to the sky. Maybe the sun will warm us up tomorrow, and then I’ll float up to the clouds.” He closed his eyes and drifted off to sleep.

Clearing Streets and Driveways of Snow in Chicago

Snow removal in Chicago is serious business. While commuters depend on the city to keep roads clear so they can travel to and from work, homeowners also have the responsibility to do their share of snow removal. According to the Municipal Code of Chicago (4-4-310 and 10-8-180), property owners and occupants are responsible for keeping sidewalks clear of snow and ice. But lately, winters have been record-setting in terms of snowfall, making it difficult for city snow plow drivers as well as homeowners to keep up with the demands of snow removal.

And last year, Chicago residents got an early dose of winter with the second heaviest November snowstorm since 1895. In fact, several parts of the country experienced record setting storms and snowfall during the winter of 2015-2016. And weather experts expect more of the same for the next several upcoming winters.

But Chicago residents have options when it comes to preparing for the next snow season. In addition to having extra supplies on hand and keeping the cupboards and refrigerator well stocked, some Illinois residents are turning to radiant heat.

Radiant snow melting system installed in a loading ramp
A radiant heated loading ramp in operation during a snowstorm.

Warmzone snow melting systems are energy efficient and maintenance free. Not only do these systems eliminate the need for manual snow removal, but they have proven valuable to businesses by keeping entrances and parking areas clear of snow and ice for customers.

Electric snow melting systems are fully automated, so they operate only when needed. The systems include an advanced snow sensor that detects temperature and precipitation. When temperatures are below a set point – typically 39° Fahrenheit – it sends power to the embedded heat cable, warming the area and preventing snow accumulation.

As an industry leader, Warmzone snow melting systems feature trusted heat cable that is available off the spool or pre-spaced in mats that can be rolled out for easy installation. The electric radiant heating mats are laid out and secured, and then the medium (concrete, pavers, or asphalt) is applied directly over the cable.

The proven ClearZone electric snowmelt system is commonly installed in both commercial and residential applications. From large heated driveways and parking areas to custom sized walkways, ramps and loading docks, ClearZone systems are versatile and can be easily customized.

Warmzone’s fully automated system includes the embedded heat cable, an activation device (snow sensor), contactor panel, and marker plate (as required by the NEC). These electric systems are also maintenance free and relatively easy to install.

In addition to providing the highest quality radiant heating products, Warmzone also offers unmatched customer services. Each system is professionally designed, so you’ll know the exact layout and materials, proper load calculations, breaker sizes, number of breakers, and system performance expectations before one foot of heat cable is installed.

Warmzone also includes free installation support services. Our expert staff is on hand during your installation if you need. Should your installer have any questions during the installation, he/she can speak with one of our installation experts to resolve any issues. Free installation training is also available. When it comes to customer service, you’ll find that Warmzone is second to none.

Contact Warmzone today and learn more about the radiant heating options that are available. In addition to offering heated driveways and snow melting systems, Warmzone also offers premier roof deicing and floor heating systems. Call 888.488.9276 to learn more.

Radiant Floor Heating Systems take New York by Storm

Many New York City area homeowners have turned to radiant heated floors for use as their primary home heating source or to supplement their existing home heating system. In addition to providing luxurious warmth, the energy efficiency and silent, maintenance-free operation of radiant heat has attracted homeowners throughout the tri-state area. As owners of radiant floor heating systems have attested, nothing is finer than walking on warm floors during a cold winter day.

Warmzone offers a variety of electric radiant floor heating systems, as well as hydronic heated floors for homeowners and businesses alike. And because Warmzone manufactures and carries the industry’s most trusted floor heating systems, consultants can evaluate the customers’ needs and determine the best system for heating each specific floor type. Warmzone’s selection helps to ensure that customers receive the most effective floor heating system for the unique layout and type of flooring in their home.

While there are some standout radiant floor heating systems, it is important to know that no single floor heating system is ideal for every type of flooring. So avoid any radiant heat provider that makes such a claim. It’s critical to speak with an unbiased radiant heating expert who can offer you a wide selection of reputable floor heating options to choose from – without bias towards one system. Don’t be talked into purchasing a floor heating system simply because it’s the only system that the provider offers. Deal with an industry leader that can show you a wide selection of radiant floor heating solutions and explain the benefits and traits of each one.

Radiant heated floors are commonly installed in bathrooms and rooms where small children spend a majority of their time on the floor. Heating homes from the floor up results in greater efficiency and comfort. As such, homeowners in New York City and throughout the tri-state area are turning to radiant heat to optimize their home heating options.

Heating Tile Floors
The most proven system for heating tile floors is the ComfortTile floor heating system. ComfortTile features thin 1/8 to 3/16-inch diameter heat cable that is available on spools or pre-spaced on flexible fiberglass mesh backing with adhesive so it can be rolled out and then secured to the subfloor for easy installation. (See the photo below.) ComfortTile heat cable is also one of the most versatile floor heating systems.

Heating mats being installed to heat a bathroom floor
ComfortTile floor heating mats being installed for a heated bathroom floor.

ComfortTile heat cable can also be used in conjunction with the Prodeso floor heating membrane. The Prodeso membrane system is an innovative uncoupling and waterproofing system for heating floors and other surfaces without movement or expansion joints in the screed. ComfortTile heating cable is inserted into the channels of the membrane.

Heating Hardwood and Laminate Floors
Many homes in New York feature hardwood or laminate flooring. Warmzone offers several choices for heating hardwood and laminate, but the most popular solution is the low-voltage FloorHeat STEP system.

This unique floor heating system features a self-regulating, semi-conductive polyethylene heating element. Because the flexible heating element is so thin, it won’t affect the floor buildup, weight loads, or your choice of flooring. (Learn more about heating hardwood floors. or read our tips for Installing Heated Floors.)

Heated hardwood floor
Heated hardwood floor. The Warmzone radiant floor heating system operates quietly and efficiently beneath the beautiful hardwood floor.

(The unique attributes of FloorHeat STEP make this versatile polymer heating element a popular choice for heating roofs as well. RoofHeat STEP is one of the most trusted roof heating systems available.)

Heating Concrete Underfloor Slabs
The In-Slab radiant floor heating cable is designed for installation in new concrete slab applications. The heat cable is embedded at least ½-inch below the floor’s surface. In-Slab cable uses the concrete slab to efficiently store and distribute heat evenly throughout the intended area. The cable is affordable and can be installed to warm any type of flooring, including hardwood, carpet, tile, and more.

Heating Existing Floors
Warmzone also carries RetroHeat, a thin “film” heating element that can be stapled up between floor joists to heat existing floors. The paper-thin heating element can be cut on site and is then stapled up between the floor joists and common Batt insulation is then installed over the heating panel. This directs all the heat upwards to warm the existing floor.

These are just some of the choices New York residents have to heat their floors. Whether you’re looking to heat carpet, tile, marble, hardwood or any other type of floor, you won’t go wrong dealing with Warmzone.

In addition to Warmzone’s industry leading products, Warmzone provides unparalleled customer services, which include professional system design, free installation training, and personal, expert installation support. Call a radiant heat professional today at 888.488.9276 to discuss your floor heating options.