Tag Archives: Snow melting installation

Questions About Installing a Snow Melting System?

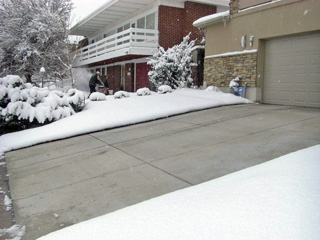
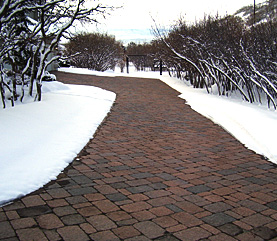
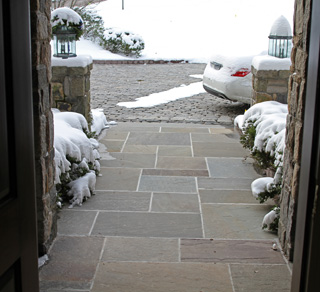
Installing a snow melting system is one of the best ways to give any home or business a much-needed upgrade this fall. An industry-leading snow melting system from Warmzone is an investment that will enhance safety and convenience each winter. Without the hassle of back-breaking shoveling, any homeowner can stay warm and toasty during winter storms, while pedestrian traffic remains safe.

With multiple options suitable for any application or medium, making the right choice can be tough. At Warmzone, exceptional customer service means anticipating questions and concerns that customers have. If you’re thinking about adding a radiant heated driveway to your home or business, please call a friendly radiant heat expert today at 888-488-9276. Also, check out these frequently asked questions about snow melting systems.

How do heated driveways work?
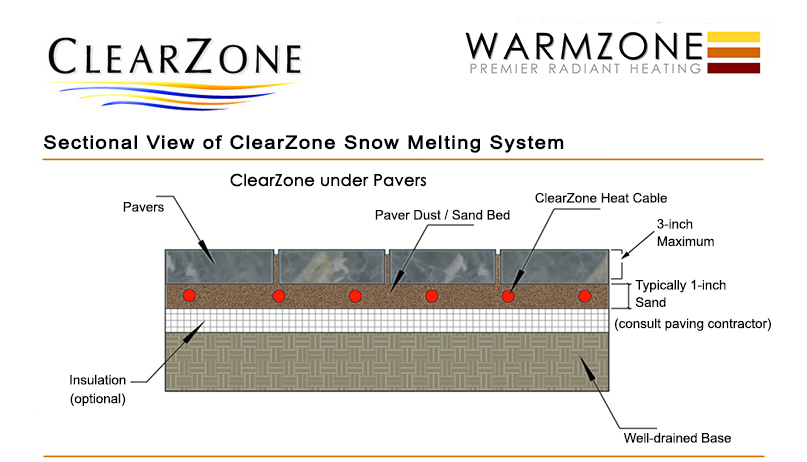
Heated driveways are an energy-efficient, environmentally friendly way to keep any driveway free of snow and ice. Warmzone’s heated driveway systems are fully automated, and include a heating element, activation device, and controller. This means that the snow melting systems only operate when weather conditions warrant. When the activation device (either a pavement-mounted snow sensor or an aerial-mount sensor) detects moisture, and the temperature is below the set point (usually 39°F), it signals the system controller. The controller then sends power to the heating element that is embedded in the driveway. The heated area will begin to warm, preventing any snow accumulation.

What are my layout options?
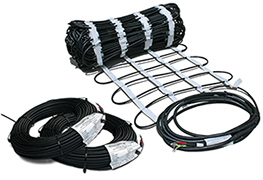
Warmzone has an array of trusted products and endless customization options to suit the needs of any home or business owner. Based on your budget and performance needs, Warmzone’s professional designers will create a custom configuration, utilizing the best components for your project. ClearZone heat cable is the trusted option for keeping driveways, sidewalks, ramps, steps, and more clear of snow and ice. The versatile heat cable is available off spools or pre-spaced in mats for quick and easy “roll-out” installation. ClearZone snow melting systems are proven systems that have been installed in residential and commercial applications throughout the country.

Heated driveway

Warmzone professionals can customize your snowmelt system to meet virtually any layout requirement, as well as accommodate your budget. When working with Warmzone, you have a wide range of options for your snow melting needs. For example, instead of heating your entire driveway, you may prefer heating only an 8-foot wide strip in the middle of the driveway. Or you can install two 24-inch wide tire tracks for the length of the driveway. You may also choose to only heat trouble areas, such as inclines, or a section of the driveway that is always shaded, or areas with high-traffic. Warmzone professionals have decades of experience designing custom radiant heat systems that meet the specific requirements of our customers. Whatever your snow melting needs and budget are, Warmzone professionals will create the ideal system for your project.

Is installation difficult?
Snow melting systems are not difficult to install, but it is vital to have a qualified electrician wire the system (to ensure that the warranty remains valid). Keep in mind that a snow melting system is only as good as its installation, so take advantage of Warmzone’s industry leading customer support services, such as the free installation training and technical support. Radiant heat experts are available anytime for questions, and instructional videos are also available online to assist you during installation. Taking advantage of these services will prevent stress and save time during installation.

Following proper installation techniques help to ensure that radiant heat systems perform as intended. Here are some basic guidelines when installing a snow melting system:

Never cut or alter the heating element.
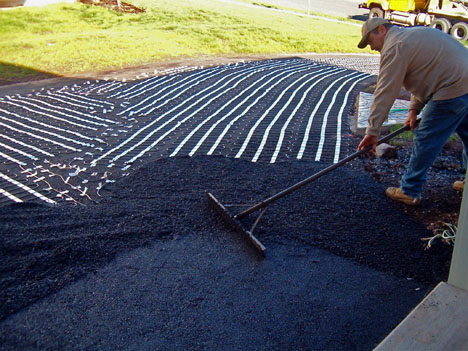
ClearZone snow melting mats may be cut to size and trimmed on-site, but do not cut the actual cable. If there is extra cable, utilize it by decreasing spacing (minimum spacing is 2-inches) or routing cable around the perimeter within the heated area. To make turns, cut the tape backing of the mat (not the cable) and then route the cable accordingly.

Heat cables must never touch, cross, or overlap.
Touching cables will cause cable burnout due to excessive heat. Always maintain a minimum spacing of at least 2 inches.

Use special care when working around the heating cable.
Tools such as trowels, shovels, or rakes can damage cable. If possible, avoid using steel trowels, and take care when using shovels during concrete or asphalt installations.

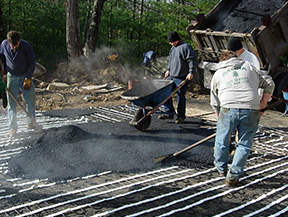
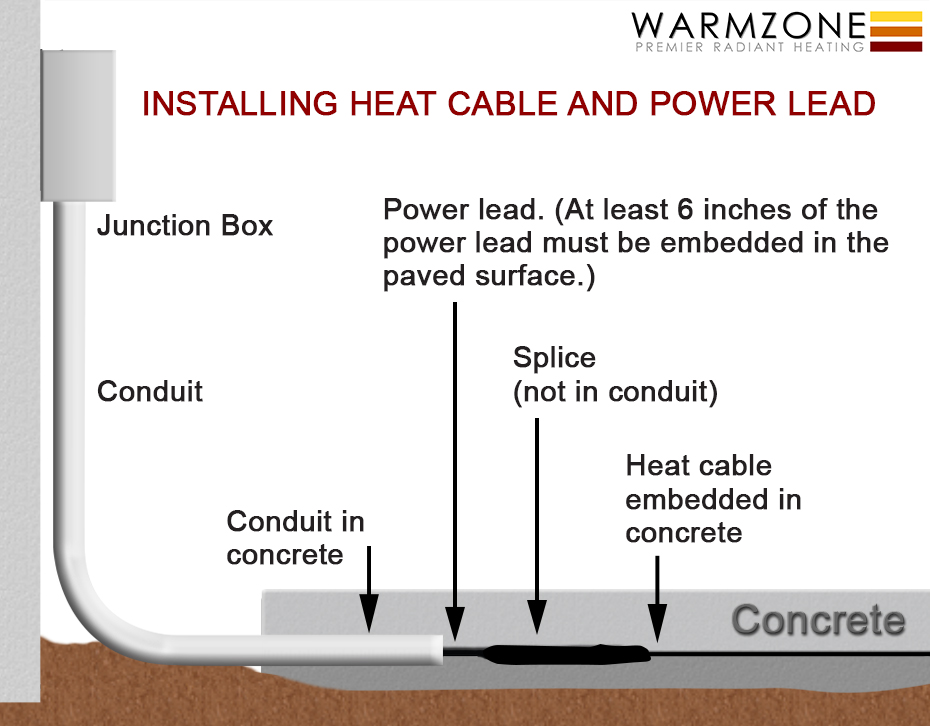
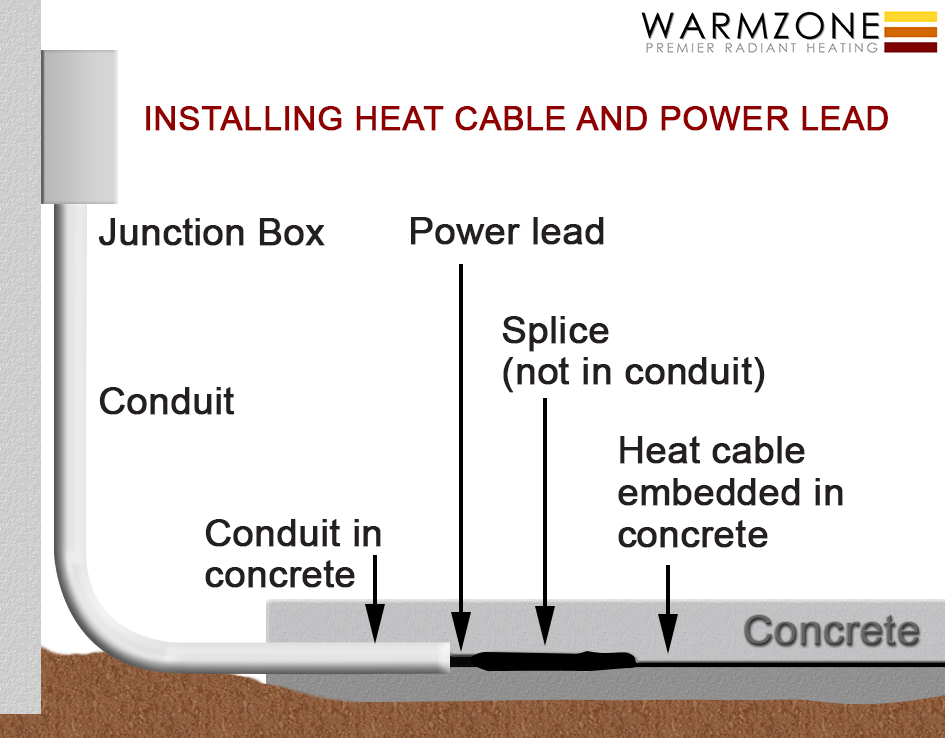
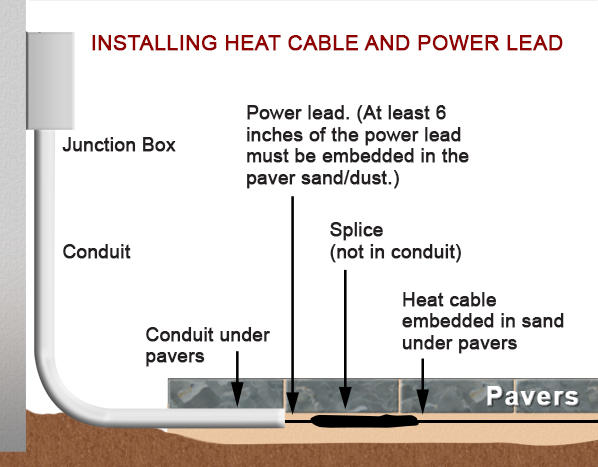
When working with concrete, heat cable must be attached to remesh with zip ties or cable strapping.
Use Mesh-Up support chairs for the remesh and then secure the heat cable to the remesh. This helps to prevent the cable from being pushed down by the weight of the concrete pour. The heat cables should be about 2-inches below the driveway surface for optimum performance.

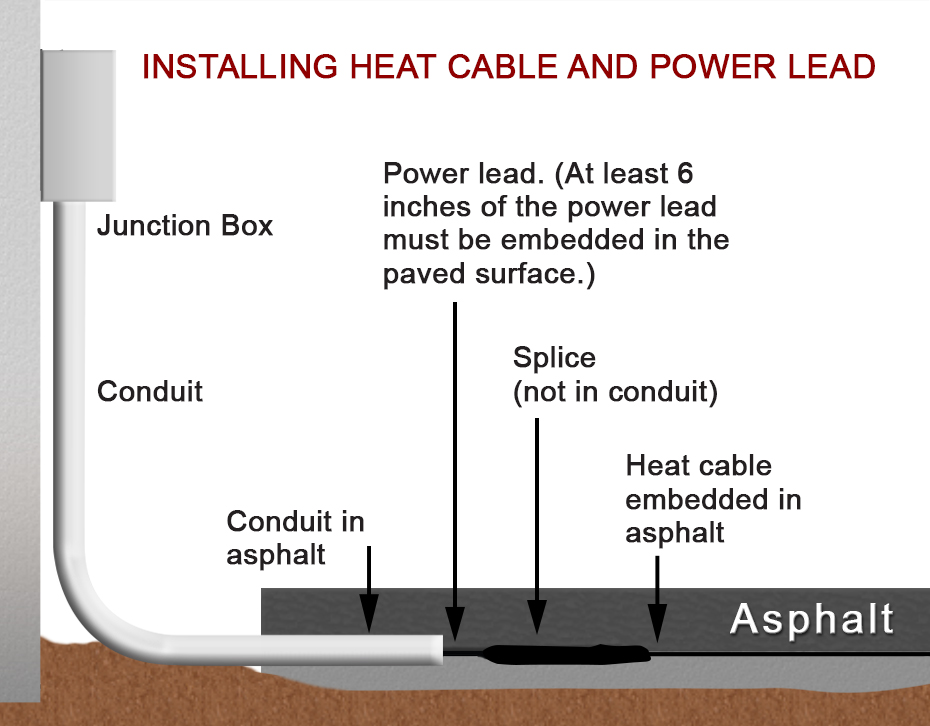
Heating cable should never pass through or cross an expansion joint.
Heat cable must be ¾ to 1-inch from the bottom of a control joint and isolated to a single pour area. When installing in concrete, never run the cable through an expansion joint.

What are the power requirements?
Warmzone’s automated snow melting systems only run when conditions warrant, so they are very efficient. Prior to the installation, have a qualified electrician evaluate the available power. Typically, homes have either a 100 or 200 amp breaker panel. For most snow melting systems, one 30-amp breaker is enough to heat a 170 square-foot area. That means heating 350 square feet requires two 30-amp (or one 60-amp) breakers. If the power at your home is insufficient, it is still possible to reap the benefits of a snow-melting system.

Warmzone designers can employ a technique called zoning. The area to be heated is divided into individual zones. Power is sent to each zone separately to optimize available power. Warmzone also offers a new sequencer that will “bounce” power from zone to zone. This sequencing allows larger areas to be heated almost simultaneously with a minimal increase in melt time. This technology is far more efficient than traditional prioritized zoning. With Warmzone’s industry-leading technology, any home or business can enjoy an automated snow melting system.

How much do heated driveways cost, and what are the operating costs?
Warmzone designs snow melting systems according to ASHRAE standards, whereby the average temperature and snowfall of each location is taken into consideration. This ensures that Warmzone snow melting systems are effective and cost-efficient. For an average snowstorm, the operating cost of a radiant heat system is usually less than what you’d pay for a professional snow removal service. Keeping areas free and clear of snow each year is no longer a chore, and can save you a great deal of time and stress. Radiant heat for snow melting also extends the life of concrete driveways and walkways. Abrasive snow removal methods, chemicals, or salt are no longer necessary, keeping concrete looking new for years to come. Determining approximate operating costs can also be done with a simple calculating operation costs formula.

What kind of support services does Warmzone offer?
Warmzone prides itself on its premier customer service offerings. Working with Warmzone starts with professional design services for every client. An experienced radiant heat system designer will work hard to consider every aspect of your project in order to meet your snow melting needs and your budget. Customers will receive a detailed AutoCAD that provides all the necessary information needed before installation. The layout, materials, and all electrical information such as load calculations, number of breakers, and breaker sizes are all included.
Warmzone also offers free installation training and technical support for installers. Professionals are available to answer questions anytime and training is available online via web conference, or in person. You can also access the wealth of online resources Warmzone has available. Whatever you need, Warmzone’s dedicated and trusted experts will provide superb customer service through every step of the process.

For more information, call a friendly radiant heat expert today, at 888-488-9276.

Installation Tips – Installing a Snow Melting System in Asphalt

Installation Tips for Installing Snow Melting Heat Cable in Asphalt (Quick Reference Guide – Article 1 in a Series of 3)

Remember to check the element resistance and the insulation resistance of the heating cable/mat at the recommended intervals:

  1. In the box: Write the values on the warranty card.
  2. After being laid out: Write the values on the warranty card.
  3. After being covered: Write the values on the warranty card.
  4. Record your readings in the installation manual.
  • When laying out the cable, DO NOT allow heating cables to touch, cross, overlap or get bunched up. Minimum allowable spacing is 2 inches.
  • Do NOT place asphalt that is higher in temperature than the cable’s maximum rated temperature on the heating cables.
  • Heating cables should be securely fastened so they do not move or shift during the embedment process.

Applying hot asphalt over heat cable mats

  • Do NOT use a track application machine on the asphalt. Rubber tire applicators are okay as long as the asphalt temperature is below the maximum rated temperature for the heating cables.
  • The operating weight of the asphalt roller should not exceed 1,000 pounds. (The heat cable is designed to handle 8.9kN before the insulation is damaged, which will cause the cable to fail.) NOTE: A walk-behind roller imparts a force of between 5-18 kN.
    • Use a small power roller to compact asphalt over cable on sand, concrete, or ½-inch aggregate. A smaller roller will take more time, but decreases the chance of damaging the heating cable.
    • A roller with 30 kN or less is allowable when heating cable is in concrete and the concrete is then covered is asphalt.
    • When compacting/rolling on a grade, do not stop the roller. Stopping and resuming the roller may stretch and break the heat cable.
  • Do NOT dump large quantities of asphalt on small sections of the heating cables. Doing this may cause damage to the cable because of excessive, focused heat. Ideally, the asphalt should be applied by hand.

Installing a heated asphalt driveway

  • Do NOT cut or alter the heating cable. Mat tape may be cut, but the heating cable must never be cut.
  • Embed all of the heating cable and the splice in the asphalt. Allow asphalt to cool to a temperature of approx 212°F (100°C) before applying directly over the cable and splice.

Installing the cable splice in asphalt.

  • Manually lay the asphalt and spread the material evenly around and over the heating cables.
  • Heating cables are normally covered by 2-inches of asphalt. Leave a buffer of 4 to 6 inches of unheated asphalt around the edge of the heated area. This allows for adjustment of paving surface edges without damaging the heating cable.
  • Handle heating cables carefully – use extreme care with tools such as shovels, rakes and wheel barrels to avoid damaging the cables.
  • Verify cable integrity by checking resistance often during installation.
  • It is important that the snow melting system be wired by a licensed, qualified electrician and in accordance with local laws, codes, regulations, and NEC guidelines.
  • Ground sensors/cups should not be exposed to temperatures above 80°C (176°F).
  • A perimeter of a maximum of 12 inches of asphalt should exist around the embedded cables. This allows for adjustment of the paving surface edge without damaging the heating cable.

* This list is intended as a general quick reference guide. It is NOT a substitution for proper training and following the installation manual. Always read and follow the installation manual. Web-based training is available on request.

For more information about installing heated driveways and snow melting systems, visit Warmzone’s Installation Overviews web page. Warmzone also provides a host of radiant heat installation videos online as well. Call us today for more information at 888.488.9276.

Installation Tips – Installing a Snow Melting System in Concrete

Installation Tips for Installing a Snow Melting System in Concrete (Quick Reference Guide – Article 2 in a Series of 3)

Remember to check the element resistance and the insulation resistance of the heating cable/mat at the recommended intervals:

  1. In the box: Write the values on the warranty card.
  2. After being laid out: Write the values on the warranty card.
  3. After being covered: Write the values on the warranty card.
  4. Record your readings in the installation manual.
  • Ensure that all sharp stones and debris are removed from the area where the heating cable will be installed.
  • Place the remesh in preparation of the concrete pour.
  • Lay the cables/mats according to the plan and fasten them to the remesh or rebar (using plastic zip-lock ties) so that they do not move during the concrete pouring.
  • Do NOT allow heating cables to touch, cross, overlap or get bunched up.

wz-sm-Heating_Cable_Tips-Keeping_Your_Cable_Safe thumbnail

  • Do NOT cut or alter the heating cable. Mat tape may be cut, but the heating cable must never be cut. View the video How to Make Turns with mats.
  • Heating cable/mats should be spaced at no less than 2-inches center-to-center and no more than 4-inches center-to-center. This also applies to adjacent heating mats.
  • Secure the heating cable to the wire mesh or grid using plastic zip ties. Make sure that the cable/mats and the wire mesh are secure so that they will not move or shift when the concrete is being poured.
  • The heating cable will need to be positioned 2-inches from the surface of the concrete. Use wire remesh and Mesh-Ups or concrete dobies/chairs to position the heating cable within 2-inches of the surface. The heating cable/mat should never rest on the ground.

Placing Mesh-Ups under cable and remesh

  • Do not allow heating cable to cross an expansion joint. Control joints are allowable under the following conditions:
    • The joint is tooled or cut NO deeper than 1¼-inches.
    • A 6-inch piece of ¼-inch angle iron is recommended to protect the cable any place where a control joint will pass over it. The heating cable is tightly strapped to the angle iron with plastic zip ties.
    • Mark the forms where the angle irons are located to accurately place the control joints.
    • The cable must be ¾ to 1-inch below the bottom of the joint. (Do NOT tool joints deeper than 1½ inches. Stay above heating cables.)
  • Embed all of the heating cable and the splice. The cold lead on the heat cable and mats is not rated for direct burial in earth and must be run through a conduit. (The first 6-inches of the cold lead and splice must be embedded in the heated surface.) See the illustration showing the installation of the heat cable and power lead.
  • Handle heating cables carefully. Use extreme care with tools such as shovels, rakes and wheel barrels to avoid damaging the cables.
  • Verify cable integrity by checking resistance often during installation.
  • It is important that wiring of the system is completed by a licensed and qualified electrician and in accordance with local laws, codes, regulations, and NEC guidelines.

* These tips are meant for quick reference. It is NOT a substitution for proper training and following the installation manual. Always read and follow the installation manual. Web-based training is available on request.

View Warmzone installation videos.

Installation Tips – Installing a Snow Melting System Under Pavers

Installing Heat Cable under Pavers (Quick Reference Guide – Article 3 in a Series of 3)

Remember to check the element resistance and the insulation resistance of the heating cable/mat at the recommended intervals:

  1. In the box: Write the values on the warranty card.
  2. After being laid out: Write the values on the warranty card.
  3. After being covered: Write the values on the warranty card.
  4. Record your readings in the installation manual.

When laying out the cable, DO NOT allow heating cables to touch, cross, overlap or get bunched up. Minimum allowable spacing is 2 inches.

Begin installation as close as possible to the electrical source.

Heated driveway with brick pavers

DO NOT cut or alter the heating cable. The white binding tape of heating mats may be cut in order to make turns with the mats, but the heat cable must never be cut or altered.

ClearZone heating cable in mat and rolled.

To secure the cable, lay down a piece of thin wire mesh that fits the area to be heated. The wire mesh should be secured to the ground (with landscaping staples or pins) so it will not move during the embedment process.

Roll out the heating cable or mat and secure it to the wire mesh or grid using plastic zip ties. Heating cables should be securely fastened so they do not move or shift during embedment.

Heating cable should be spaced at no less than 2-inches center-to-center and no more than 4-inches center-to-center. This also applies to the cables in adjacent heating mats.

Contact paver or block manufacturer for total sand or dust depth needed for proper paver/block installation.

Sideview of heat cable installed under pavers

Embed all of the heating cable and the splice in a minimum of 1-inch (½-inch above and ½-inch below) of compacted material such as paver sand or stone dust. Cable and splice must be completely embedded. No air gaps around the cable or splice are allowable. Gauge of paver sand, stone dust or base material must be fine enough to completely encapsulate cable.

Do NOT drop pavers directly on the cable. (This can damage the cable insulation.)  If this occurs, stop installation and check cable integrity via ohm reading.

Handle heating cables carefully – use extreme care with tools such as shovels, rakes and wheel barrels to avoid damaging the cables.

Verify cable integrity by checking resistance often during installation.

It is important that this equipment be installed by a licensed and qualified electrician and in accordance with local laws, codes, regulation and in accordance with NEC guidelines.

If installing in permeable pavers or with pavers or blocks greater than 3-inches thick, contact Warmzone BEFORE installing.

* This list is intended as a general quick reference guide. It is NOT a substitution for proper training and following the installation manual. Always read and follow the installation manual. Web-based training is available on request.

Heated paver walkway

For more information about installing heated driveways and paver snowmelt systems, visit Warmzone’s Installation Overviews web page. Warmzone also provides a host of radiant heat installation videos online as well. Call us today for more information at 888.488.9276.