Tag Archives: Installation tips

Tips for Installing Radiant Snow Melting Systems

Avoid Common Installation Mistakes

Installing a radiant snow melting system is not a difficult task, but there are a few important tips that installers should keep in mind. Perhaps the most important “tip” for installers is this: Take advantage of the free installation training provided by Warmzone.

We make the training easy. Installers can schedule their training online, via video conference. You’ll have a personal instructor who will cover every aspect of your installation, and you can stop and ask questions any time.

The other most important tip we can offer is to read the installation manual and follow the steps provided. A common mistake is that some installers are so eager to dive into the installation, that they don’t take the time to read the installation manual. Make sure you read the manual (and test the heat cable) prior to beginning the physical installation. Also, confirm that you have the right products for your installation. The voltage and wattage information of the heating cable is provided on the label of the box, so check this beforehand. If you need, you can call Warmzone’s technical support staff. We’re available to you throughout the installation process.

After confirming that you have the right cable, open the box and use a megohmmeter to perform OHM tests of the heat cable. It’s important to text the cable throughout the installation process. Test it before removing it from the box, as well as during and after the installation. This way you’ll discover any potential problems as early as possible. This will save you time and ensure a successful installation. Be sure to document the results (as outlined in the manual) to maintain the manufacturer’s warranty.

As you begin to layout the heat cable, keep these important guidelines in mind:

Always maintain proper cable spacing. Sometimes the cable may shift slightly after laying it out, so double-check the spacing before covering it.
Never cut, cross or overlap the heating cable. The heat cable should not be altered under any circumstance, as it may cause overheating and damage the cable.
Always embed the cable completely. Leave no air around the cable.
Make sure to embed the factory splice (where the heating cable and power lead meet). See the illustration provided.
Use a megohmmeter to perform OHM tests of the heat cable before removing the cable from the box, during the installation, and after the cable has been laid out.
Always run the cold lead in a conduit (The power lead for the heating cable is not intended for direct burial.)
A few important guidelines to remember when installing the heat cable for an automated radiant snow melting system.
Proper embedding of cable splice - large
Embedding the cable splice for a heated driveway.

When installing snow melting cable in asphalt, the cables should be covered by two inches of asphalt. To prevent heat damage, the asphalt should be allowed to cool to 220°F (105°C) before pouring directly onto the mats or cables. (The in-ground snow sensors/tubes should not be exposed to temperatures above 176°F (80°C).) Warmzone offers specially constructed heat cable for installation in hot asphalt applications. ClearZone heat cable for asphalt is rated up to 460 degrees for up to 10 minutes.

When installing a new heated asphalt driveway, the snow melting cable is laid out on the binder or base coat and then approximately 2-inches of asphalt is hand shoveled directly on top of the cable. The asphalt is then compacted, using a 1-ton roller or less.

When installing the snow sensor (either an aerial-mount or ground-mount), make sure it has a clear, 360-degree “view” of the sky to allow snow to fall onto the sensor plate. This ensures that the system will activate when needed.

Example of incorrect layout of snow melting heat cable
How NOT to lay out your heat cable.
Heated driveways being installed
Heating mats properly laid out for a concrete heated driveway.

Remember, these guidelines don’t supersede the information in the instruction manual. Always refer to the manual, and don’t hesitate to contact Warmzone’s friendly technical support staff. We want you to success, so we are happy to assist you at any time.

Warmzone is one of the largest providers of snow melting, floor heating, and roof de-icing systems, as well as luxury home heating amenities. For more information about our radiant heat systems or luxury amenities, contact a friendly Warmzone representative today, at 888-488-9276.

June HotNews – The Importance of Proper Installation

Radiant heat has recently come into the spotlight as an efficient and cost friendly method to heat almost any area. It is a product for both businesses and consumers that allows safety, flexibility, and comfort. From interior applications like heated floors to snow melting systems like Warmzone’s industry leading ClearZone snow melting system, there are many ways a radiant heat system can improve your home or business in the cold winter months. Knowing how a radiant heat system works and what components are needed are some of the first steps in purchasing a system, but the most important aspect of the process is installation. That’s why Warmzone offers free installation training for installers.

Scissors and cable - Never cut the heat cable
Never cut the heat cable! To make turns, cut the white binding tape and arrange the cable accordingly.

Proper installation is crucial to ensure a radiant system functions safely and as intended. Proper installation also ensures the longevity and optimum performance of the system. Since the correct installation is so important, get started here with some information from the experts at Warmzone to help assure your installation goes smoothly.

A properly installed radiant heat system begins with the components. When installing radiant heat under flooring, a heating element is the first component needed. Warmzone’s ComfortTile heat cable is perfect for custom floor heating projects. The heat cable is available on spools or pre-spaced in easy-to-roll-out mats. These mats are simply rolled out and laid over the subflooring. Keep in mind that when installing the cable/mats, it is important that the cable is never cut or damaged.

Radiant floor heating systems are then controlled with programmable thermostats and a sensor for temperature control. After cables or mats have been laid out and secured, a licensed electrician must connect the wiring and complete your installation. (This is to ensure that your warranty remains valid.)

With Warmzone’s ComfortTile floor heating systems, superior components are standard. ComfortTile cable and mats are suitable for almost any flooring, and Warmzone’s programmable thermostats are designed specifically for radiant heat systems. They are simple to use and include an installation wizard for a quick and painless installation. A thermostat from Warmzone also allows for troubleshooting by exporting your information to the web for technical support.

Automated snow melting systems require heating cable, a contactor panel, and an aerial or in-ground sensor. These systems use the aerial or in-ground sensor to detect precipitation and temperature. When weather conditions warrant, the sensor triggers the system and power is sent to the heat cables. The system runs until the area is clear and then automatically shuts down. Aerial sensors are used for most home installations, while in-ground sensors are more often used for commercial applications. This makes an automated system a great way to save time, increase safety, and keep power costs low.

An automated snow meting system can require extra consideration when installing, so it is important to work with a provider that includes complete system design and layout services. This includes the proper materials and information necessary for the electrician, such as load calculations, breaker sizes and number of breakers. By working with Warmzone you’ll be completely prepared before any installation takes place.

The ClearZone snow melting system is a proven industry leader, and includes unrivaled installation support from Warmzone. These systems can be put into driveways, sidewalks, steps, loading ramps, or just about any area that needs to be heated. When choosing and installing a snow melting system, it is important to make certain that you are using high quality, versatile, and sturdy components. At Warmzone, ClearZone snow melting heat cable is also available on spools for custom configurations, or mats for larger areas.

Warmzone’s ClearZone snow melting heat cable is a twin conductor resistance heat cable that allows it to be installed into almost any medium. Special ClearZone cable is also available for installation in high temperature asphalt applications.

Installing a heated asphalt driveway

Great products will only work if an installation is done completely and properly. When laying out the cable for your system, it should be done carefully. Installers should be careful with the use of items such as metal rakes that may damage your cable. It is important once again to be sure you do not cut the cable, and the cables are spaced properly and never touching. (Generally, cables should be 3-4 inches apart, depending on your system.) The cables must be properly secured to the remesh as well.

To keep the cable from resting on the ground, place MeshUps plastic chairs under the remesh. These supports keep the cable off the ground during concrete pours and ideally, keeps the cable 2 inches from the surface being heated. This step prevents suboptimal performance and will help maintain the soundness of the cable in your snow melting system. If your cables are touching or not installed appropriately it can ruin the cable and make your system inoperable. Another important way to avoid an inoperable system is to test your cables when you receive them, as well as throughout installation.

When installing your aerial sensor, it is important for proper functioning that the sensor is unobstructed from the weather, so it can accurately detect temperature and precipitation. After installing your snow melting system or any radiant heat system purchased from Warmzone, fill out your warranty card. This is a step that many customers forget.

A snowmelt system can be installed by anyone, but the value of installation training and support is immeasurable in helping to avoid confusion and mistakes while installing. Warmzone is the industry leader in installation support. Not only can you or your installer contact a Warmzone professional at 888-488-9276 at anytime, you will also have access to other industry leading installation help that can make your installation quick and simple. With Warmzone’s professional design services, you can receive a detailed AutoCAD, which includes all the details of your system, from layout, to the power requirements, and all of the technical specs. It helps to ensure the proper installation of your system.

If you have questions about your components or system layout, Warmzone has technical support experts on staff ready to help. Warmzone also has videos and general installation overviews available. Technical guides and installation manuals are also available online.

If you are more interested in training prior to installation, check out Warmzone University. Warmzone university is completely free and has personal installation training that you can complete online with your instructor. You can also take the training in person at Warmzone’s office in Salt Lake City, Utah. An installation expert is also available to speak to at anytime at Warmzone, or if you need an electrician or contractor to help with installation, Warmzone can connect you with one in your area.

Warmzone understands the importance of installation and has the options to make sure your system is installed correctly. Check out Warmzone’s industry leading services. If you’re interested in a free quote or have other questions, contact a professional today at 888-488-9276.

Pre-Installation Checklist

Radiant Heat Experts Offer Key Advise and Tips on What NOT to do When Installing Radiant Heat

Radiant heat systems work. It’s a proven technology that produces impressive results. But like most technology related products, if a radiant heat system isn’t installed correctly, the results can be equally disappointing. Installing a radiant heat system is not difficult, but it does need to be done properly. You can buy the best snow melting system components on the market, but unless they’re installed correctly, you won’t see the results you’re expecting.

Recently named “Vendor of the Year” by the National Association of Custom Home Builders, Warmzone is a proven and trusted industry-leading provider of radiant heated driveways, heated floors and roof deicing systems. The company achieved its position by not only offering superior products, but by including the industry’s most comprehensive customer support services, including free installation training, technical support, and system design. These unparalleled services distinguish Warmzone from the competition, and have set the gold standard for all radiant heat providers.

“Our products not only work, but they’re among the industry’s best,” stated Bryan Morris, Director of National Sales for Warmzone. “But unless installers follow a few simple guidelines and install these systems correctly, the quality of the materials will make little difference.”

Installing a heated paver driveway.

Some of the most common installation mistakes include:

  1. IMPROPER CABLE SPACING. Too often, installers neglect to follow the cable spacing rules: Keep the cable at a minimum spacing of 2 inches and a maximum of 4 inches (center-to-center). Make sure the cable in adjacent mats is at least 2 inches apart.
  2. IMPROPER CABLE DEPTH. In concrete applications, many times installers allow the heat cable to rest on the dirt prior to the concrete pour. (Invest in Mesh-Ups. These plastic support ‘chairs’ are extremely affordable, and they can make all the difference in the world between a successful and an unsuccessful installation.) Mesh-Ups elevate the re-mesh (and heat cable) so that it is not resting on the ground when the concrete is poured. It’s a simple, affordable solution to prevent poor snow melting system performance, not to mention unhappy customers.
  3. NEGLECTED WARRANTY CARD. Too many installers forget to fill out the warranty card and mail it to the manufacturer. Don’t let this happen.
  4. FORGETTING TO TEST THE CABLE. Too many installers forget to test the cable during all phases of the installation. Start by testing the cable out of the box and then throughout the installation.
  5. COMPROMISED HEAT CABLE. Maintain the cable integrity by never cutting the cable, and take extreme caution when using shovels and rakes during concrete pours.

One way to limit mistakes during an installation is not only to avoid the above errors, but to follow the handy checklist below, put together by Warmzone’s experienced support staff:

PRE-INSTALLATION CHECKLIST

Before buying and installing a radiant heat system, review the checklist below.

  • Verify the correct voltage of your home or business (220/240 or 110/120).
  • Verify the available amperage. Don’t guess or assume. You’ll need to be certain, so we recommend having an electrician come to your location to measure the amperage.
  • Do your homework before hiring an electrician. Let’s face it, not everyone is competent or ethical. Preferably, find one who has been in business for several years. Ask around and talk with those who have personal experience with electricians.
  • Keep in mind that the National Electric Code (NEC) requires that the system has 30mA GFEP (30mA trip protection).
  • Make sure the installer has completed Warmzone’s free installation training course.

After installing your radiant heat system, fill out and mail your warranty card.

Perhaps the most overlooked tip – and one that can eliminate installation mistakes and unhappy customers – is to take advantage of the free training!  Call 801.948.7577 or 888.488.9276 to sign up or learn more.


Part II: Stories from the Support Desk

Learn From Your Mistakes

Installation Support Experts Reveal Some Unfortunate Installer Mistakes

While most mistakes can be remedied, it is – of course – much easier to simply do the job right the first time. Here are some stories of past installation blunders that could have easily been avoided:

Installation #1:  DON’T CUT THE CORD!

Instead of starting the cable installation as close as possible to the electrical source, one installer began running the cable from the terminated end. After laying out the cable, he discovered that he had about 60 extra feet of heat cable – including the splice to the cold lead. He cut the excess cable and then ran the heat cable (from the terminated end) directly into the ETO2 control unit!

Scissors and cable - Never cut the heat cable
Never cut the heat cable! To make turns, cut the white binding tape and arrange the cable accordingly.

Needless to say, this presented a significant fire hazard, not to mention that the entire system was now inoperable. This disaster could have been easily prevented with a few minutes of consulting with one of our support staff, or by completing one of our installation training courses.”

Installation #2:  SPACED OUT

Many installation problems are a result of improper spacing of the heat cable. And while mats come with the cable pre-spaced, the adjacent mats still must be spaced no less than 2 inches apart. The photo below shows how one installer laid out the cable and then applied the concrete pour. Instead of cutting the white binding tape to make turns with the mats, the cable was simply ‘serpentined’ all across the driveway; overlapping and bunching up and so on.

Example of incorrect layout of snow melting heat cable.
Example of incorrectly laid out heat cable for heated driveway. Cable must not touch or overlap. Always follow the installation guidelines regarding the correct layout of the heat cable.

Correct layout of heat cable
Example of heat cable (in mats) laid out correctly for a heated paver driveway.

Again, this could have been avoided by making a simple call to Warmzone, viewing one of our installation videos online, or completing an installation training course. Instead, the concrete had to be dug up and the system replaced. Don’t have time to take the 45-minute installation training course? Think again.”

“Mistakes like these shouldn’t happen,”  Morris emphasized. “Installers can complete a simple installation training course prior to installing the system, and they can always call a member of our support staff if they have any questions during the installation. If they do either of these things, then they’re likely to save themselves a lot of stress.”

Don’t Forget:

Test the heat cable during the installation and record the readings in the fields provided on the warranty card. After installing your radiant heat system, complete and mail your warranty card.

Double check your cable spacing. (Minimum spacing of 2 inches and a maximum spacing of 4 inches.)

Perhaps the tip that can most effectively eliminate installation mistakes and unhappy customers is this: Take advantage of the free training! 

Installation Tips – Installing a Snow Melting System in Asphalt

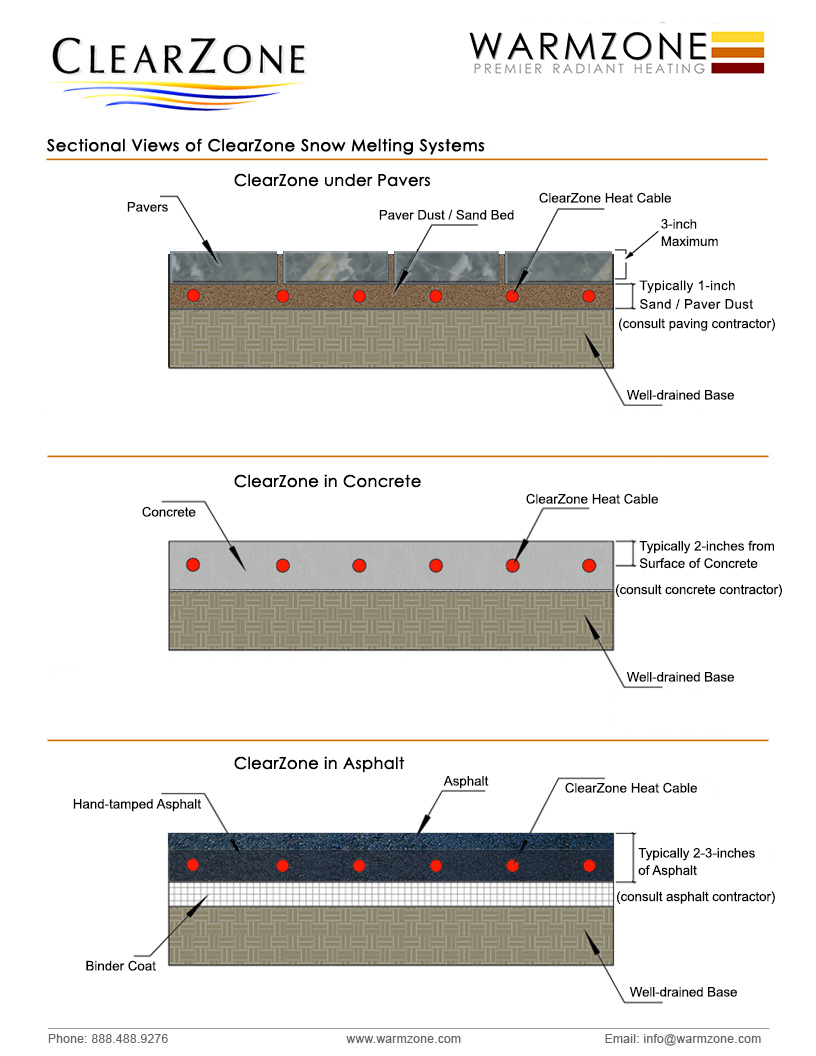
Installation Tips for Installing Snow Melting Heat Cable in Asphalt (Quick Reference Guide – Article 1 in a Series of 3)

Remember to check the element resistance and the insulation resistance of the heating cable/mat at the recommended intervals:

  1. In the box: Write the values on the warranty card.
  2. After being laid out: Write the values on the warranty card.
  3. After being covered: Write the values on the warranty card.
  4. Record your readings in the installation manual.
  • When laying out the cable, DO NOT allow heating cables to touch, cross, overlap or get bunched up. Minimum allowable spacing is 2 inches.
  • Do NOT place asphalt that is higher in temperature than the cable’s maximum rated temperature on the heating cables.
  • Heating cables should be securely fastened so they do not move or shift during the embedment process.

Applying hot asphalt over heat cable mats

  • Do NOT use a track application machine on the asphalt. Rubber tire applicators are okay as long as the asphalt temperature is below the maximum rated temperature for the heating cables.
  • The operating weight of the asphalt roller should not exceed 1,000 pounds. (The heat cable is designed to handle 8.9kN before the insulation is damaged, which will cause the cable to fail.) NOTE: A walk-behind roller imparts a force of between 5-18 kN.
    • Use a small power roller to compact asphalt over cable on sand, concrete, or ½-inch aggregate. A smaller roller will take more time, but decreases the chance of damaging the heating cable.
    • A roller with 30 kN or less is allowable when heating cable is in concrete and the concrete is then covered is asphalt.
    • When compacting/rolling on a grade, do not stop the roller. Stopping and resuming the roller may stretch and break the heat cable.
  • Do NOT dump large quantities of asphalt on small sections of the heating cables. Doing this may cause damage to the cable because of excessive, focused heat. Ideally, the asphalt should be applied by hand.

Installing a heated asphalt driveway

  • Do NOT cut or alter the heating cable. Mat tape may be cut, but the heating cable must never be cut.
  • Embed all of the heating cable and the splice in the asphalt. Allow asphalt to cool to a temperature of approx 212°F (100°C) before applying directly over the cable and splice.

Installing the cable splice in asphalt.

  • Manually lay the asphalt and spread the material evenly around and over the heating cables.
  • Heating cables are normally covered by 2-inches of asphalt. Leave a buffer of 4 to 6 inches of unheated asphalt around the edge of the heated area. This allows for adjustment of paving surface edges without damaging the heating cable.
  • Handle heating cables carefully – use extreme care with tools such as shovels, rakes and wheel barrels to avoid damaging the cables.
  • Verify cable integrity by checking resistance often during installation.
  • It is important that the snow melting system be wired by a licensed, qualified electrician and in accordance with local laws, codes, regulations, and NEC guidelines.
  • Ground sensors/cups should not be exposed to temperatures above 80°C (176°F).
  • A perimeter of a maximum of 12 inches of asphalt should exist around the embedded cables. This allows for adjustment of the paving surface edge without damaging the heating cable.

* This list is intended as a general quick reference guide. It is NOT a substitution for proper training and following the installation manual. Always read and follow the installation manual. Web-based training is available on request.

For more information about installing heated driveways and snow melting systems, visit Warmzone’s Installation Overviews web page. Warmzone also provides a host of radiant heat installation videos online as well. Call us today for more information at 888.488.9276.

Installation Tips – Installing a Snow Melting System in Concrete

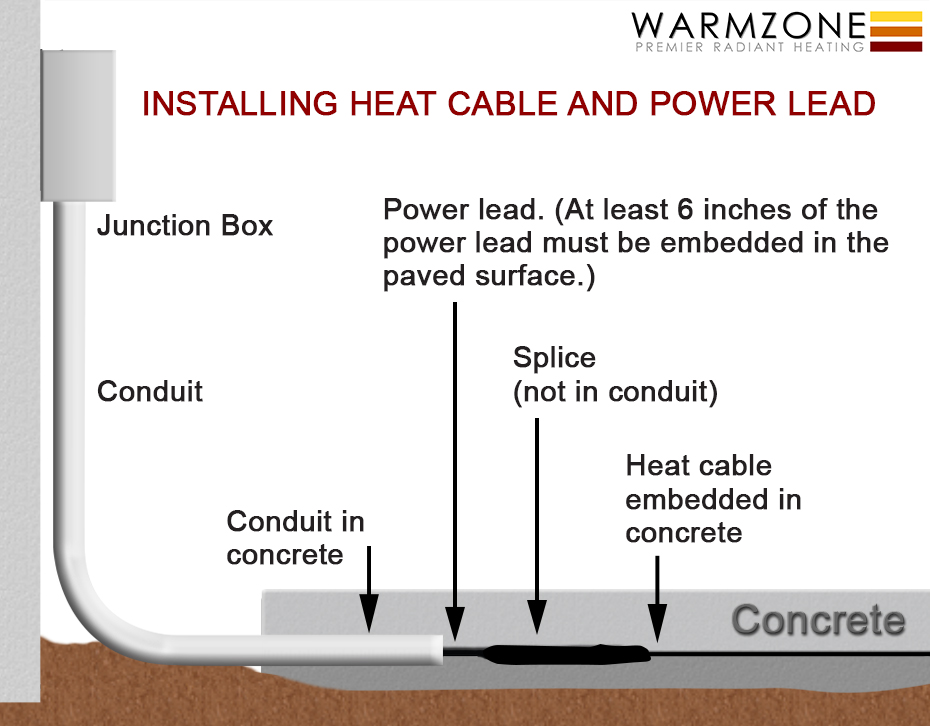
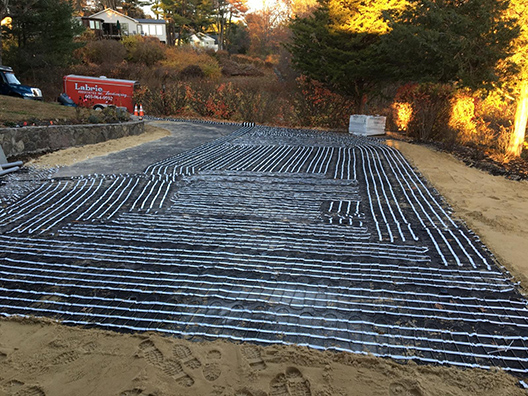
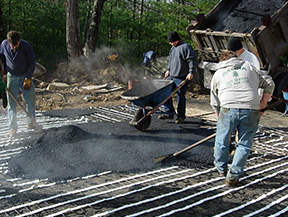
Installation Tips for Installing a Snow Melting System in Concrete (Quick Reference Guide – Article 2 in a Series of 3)

Remember to check the element resistance and the insulation resistance of the heating cable/mat at the recommended intervals:

  1. In the box: Write the values on the warranty card.
  2. After being laid out: Write the values on the warranty card.
  3. After being covered: Write the values on the warranty card.
  4. Record your readings in the installation manual.
  • Ensure that all sharp stones and debris are removed from the area where the heating cable will be installed.
  • Place the remesh in preparation of the concrete pour.
  • Lay the cables/mats according to the plan and fasten them to the remesh or rebar (using plastic zip-lock ties) so that they do not move during the concrete pouring.
  • Do NOT allow heating cables to touch, cross, overlap or get bunched up.

wz-sm-Heating_Cable_Tips-Keeping_Your_Cable_Safe thumbnail

  • Do NOT cut or alter the heating cable. Mat tape may be cut, but the heating cable must never be cut. View the video How to Make Turns with mats.
  • Heating cable/mats should be spaced at no less than 2-inches center-to-center and no more than 4-inches center-to-center. This also applies to adjacent heating mats.
  • Secure the heating cable to the wire mesh or grid using plastic zip ties. Make sure that the cable/mats and the wire mesh are secure so that they will not move or shift when the concrete is being poured.
  • The heating cable will need to be positioned 2-inches from the surface of the concrete. Use wire remesh and Mesh-Ups or concrete dobies/chairs to position the heating cable within 2-inches of the surface. The heating cable/mat should never rest on the ground.

Placing Mesh-Ups under cable and remesh

  • Do not allow heating cable to cross an expansion joint. Control joints are allowable under the following conditions:
    • The joint is tooled or cut NO deeper than 1¼-inches.
    • A 6-inch piece of ¼-inch angle iron is recommended to protect the cable any place where a control joint will pass over it. The heating cable is tightly strapped to the angle iron with plastic zip ties.
    • Mark the forms where the angle irons are located to accurately place the control joints.
    • The cable must be ¾ to 1-inch below the bottom of the joint. (Do NOT tool joints deeper than 1½ inches. Stay above heating cables.)
  • Embed all of the heating cable and the splice. The cold lead on the heat cable and mats is not rated for direct burial in earth and must be run through a conduit. (The first 6-inches of the cold lead and splice must be embedded in the heated surface.) See the illustration showing the installation of the heat cable and power lead.
  • Handle heating cables carefully. Use extreme care with tools such as shovels, rakes and wheel barrels to avoid damaging the cables.
  • Verify cable integrity by checking resistance often during installation.
  • It is important that wiring of the system is completed by a licensed and qualified electrician and in accordance with local laws, codes, regulations, and NEC guidelines.

* These tips are meant for quick reference. It is NOT a substitution for proper training and following the installation manual. Always read and follow the installation manual. Web-based training is available on request.

View Warmzone installation videos.

Installation Tips – Installing a Snow Melting System Under Pavers

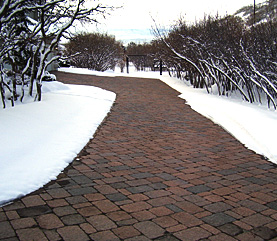
Installing Heat Cable under Pavers (Quick Reference Guide – Article 3 in a Series of 3)

Remember to check the element resistance and the insulation resistance of the heating cable/mat at the recommended intervals:

  1. In the box: Write the values on the warranty card.
  2. After being laid out: Write the values on the warranty card.
  3. After being covered: Write the values on the warranty card.
  4. Record your readings in the installation manual.

When laying out the cable, DO NOT allow heating cables to touch, cross, overlap or get bunched up. Minimum allowable spacing is 2 inches.

Begin installation as close as possible to the electrical source.

Heated driveway with brick pavers

DO NOT cut or alter the heating cable. The white binding tape of heating mats may be cut in order to make turns with the mats, but the heat cable must never be cut or altered.

ClearZone heating cable in mat and rolled.

To secure the cable, lay down a piece of thin wire mesh that fits the area to be heated. The wire mesh should be secured to the ground (with landscaping staples or pins) so it will not move during the embedment process.

Roll out the heating cable or mat and secure it to the wire mesh or grid using plastic zip ties. Heating cables should be securely fastened so they do not move or shift during embedment.

Heating cable should be spaced at no less than 2-inches center-to-center and no more than 4-inches center-to-center. This also applies to the cables in adjacent heating mats.

Contact paver or block manufacturer for total sand or dust depth needed for proper paver/block installation.

Sideview of heat cable installed under pavers

Embed all of the heating cable and the splice in a minimum of 1-inch (½-inch above and ½-inch below) of compacted material such as paver sand or stone dust. Cable and splice must be completely embedded. No air gaps around the cable or splice are allowable. Gauge of paver sand, stone dust or base material must be fine enough to completely encapsulate cable.

Do NOT drop pavers directly on the cable. (This can damage the cable insulation.)  If this occurs, stop installation and check cable integrity via ohm reading.

Handle heating cables carefully – use extreme care with tools such as shovels, rakes and wheel barrels to avoid damaging the cables.

Verify cable integrity by checking resistance often during installation.

It is important that this equipment be installed by a licensed and qualified electrician and in accordance with local laws, codes, regulation and in accordance with NEC guidelines.

If installing in permeable pavers or with pavers or blocks greater than 3-inches thick, contact Warmzone BEFORE installing.

* This list is intended as a general quick reference guide. It is NOT a substitution for proper training and following the installation manual. Always read and follow the installation manual. Web-based training is available on request.

Heated paver walkway

For more information about installing heated driveways and paver snowmelt systems, visit Warmzone’s Installation Overviews web page. Warmzone also provides a host of radiant heat installation videos online as well. Call us today for more information at 888.488.9276.

The Benefits and Custom Options of Heated Driveways and Snow Melting Systems

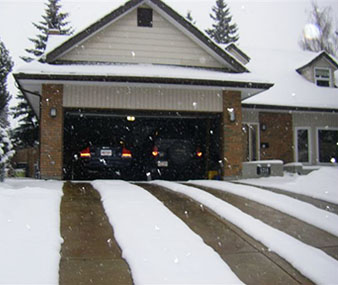
Radiant Heat Can be Tailored to Your Specific Needs and Budget

Heated driveway systems are surefire ways to enhance safety for businesses located in cold weather climates. From grocery stores to restaurants and car washes, business owners are turning to radiant heat to ensure safety and protect themselves from liability claims.

Warmzone radiant heat systems are fully automated, so there’s no need for business owners to show up at the workplace early to shovel snow. The automated systems activate when an aerial or ground-mount snow sensor detects precipitation and temperatures are below a set point (typically 39°F). The energy efficient snow melting systems operate only when needed, and are also maintenance free – another favorite feature among business owners.

Easy to Customize

Radiant snow melting systems are easy to customize. Electric snowmelt systems can be installed to heat unique shapes and areas, and can be tailored to best meet the client’s budget needs. In addition to heating entire driveways and sidewalks, some other popular layout options for heating driveways include:

Heating tire tracks: Rather than heating an entire driveway, install two 24-inch wide heated tire tracks.

Heated driveway with two heated tire tracks

Heating the Center Strip or High Traffic Areas: Heat only an 8 or 10-foot wide strip up the middle of the driveway. Or install heat cable only in the most trafficked area of your driveway. Heat trouble spots such as inclines or where shade often causes ice buildup. Instead of heating an entire sidewalk, just warm a 3-foot wide strip in the middle; or heat the steps and heavily trafficked areas of entry points and porches. Businesses often install radiant heat to melt snow and ice in parking areas and walkways near the store front as well as in loading docks and ramps.

Custom heated driveways and sidewalks

Heating specific/custom areas: Many consumers install radiant heat only for specific needs. For example, heat dog runs or kennels to keep outdoor pets comfortable, or only heat the sloped areas of a sidewalk or just the steps. The options are virtually limitless when it comes to installing heated driveways.

Heated cement steps

Visit Warmzone’s heated driveway web page for more detailed information. The information includes sections on how heated driveways work, determining the operating cost, how heated driveways work and more.

From small, custom snow melting projects to large commercial applications, radiant snow melting systems have proven to be the reliable, cost effective solution for homeowners and business owners alike.

Heated driveway and walks

Unlike other providers of radiant heat systems, Warmzone offers free installation training courses for installers, as well as complete system design and layout services and installation support. Dealing with Warmzone makes the process of finding and installing the best system easy for customers.

Information Resources:

Radiant Heat Online Information Resources

Illustrations, How-to Videos and More

Installing a radiant snow melting system is not especially complicated, but there are some important steps to remember to ensure that the system is installed and performing correctly. In addition to Warmzone offering technical support for installers as well as free installation training, Warmzone provides a wealth of information online. Some resources include helpful illustrations as well as informative installation “how-to” videos that are posted online. Below are samples of snow melting system illustrations and radiant heat videos.

Sectional view of CZ snow melting systems.

Click on image to enlarge.

Another helpful illustration for heated driveway installations outlines how to embed the cable splice for the heating cable. The example below shows a snow melting system installed to heat a concrete driveway.

Embedding the cable splice

Click on the image to enlarge.

The illustration below provides a general overview of an electric radiant snow melting system and its components.

ClearZone snow melting system and components overview.

View the ClearZone Snow Melting System Overview (above). Click on the image to enlarge.

Also, check out Warmzone’s online instructional installation videos. Topics range from reviewing and filling out warranty information to proper cable installation techniques and wiring of the system components.

Instructional radiant heat installation videos.

View additional radiant heat documents and illustrations.

View our Installation Overviews web pages.

Power Requirements and Operating Costs of a Heated Driveway

Understanding the Power Requirements for a Heated Driveway

Are you looking to install a radiant heated driveway for your home or business? If so, one of the first questions you need to answer is whether you have the necessary power requirements. In most cases, having the power needed to run an efficient radiant snow melting system is not a problem. However, prior to any installation, customers must ensure that they do meet the power requirements for heating their driveways and or walks.

Heated driveway with four heated tire tracks

So, just how does one go about determining the power requirements for heating a specific area and how does one know whether the necessary power is available? First of all, you don’t have to figure this out by yourself. Warmzone’s experienced reps are happy to work with you to not only help you determine the necessary power requirements, but to design a system that best meets your specific snow melting and budget needs.

But homeowners should be aware of some basic guidelines when shopping for radiant heat. For example, one 30-amp breaker supplies enough power to heat a 170-square foot area. To heat a driveway of 350-square feet, two 30-amp breakers (or one 60-amp breaker) would be needed. Homeowners can check their home’s main breaker panel to see the power coming into the house. (Typical homes feature either two 100 amp panels or two 200 amp breakers. These are located at the top of the main breaker box, above the main breaker panel.) But the bottom line, in terms of power requirements, is that an electrician is ultimately the one to address all power issues. If you have questions about available power, talk with Warmzone as well as a qualified electrician to make certain there are no issues should you choose to move forward with the installation.

If you’re unsure of the square footage of your driveway, no worries; Warmzone can calculate that for you too. In most areas, using a special state-of-the-art technology, Warmzone can measure the area of your driveway while talking on the phone with you. Our helpful staff will work closely with you to ensure that the square footage of the area is measured correctly and the power requirements are therefore calculated properly.

Zoning Your Driveway Heating System

On rare occasions when there is insufficient power available to operate a large driveway heating system, the radiant heat system can be laid out in zones. Each zone is powered separately. As a storm first hits, zone 1 would power up and melt the snow in that area of the driveway. After zone 1, zone 2 would then activate to melt the snow in that area of the driveway. Click here for more detailed information about zoning your heated driveway.

Determining the Operating Cost of an Electric Heated Driveway

Homeowners are also keen to know the general operating costs of a heated driveway. Because radiant snow melting systems are specially designed for the specific demands of the average temperature and snowfall of their location, no two radiant heat systems are exactly alike. However, there is a formula that can be used to help you determine the approximate operating cost of a snow melting system.

General Guidelines to Determine a Heated Driveway’s Operating Cost

  1. Determine the total square footage of the area that will be heated. (The average American home has an 800 square foot driveway.)
  2. Multiply the square footage by the heat required (37 watts per sq. ft. for residential). This will give you a total for the watts per square footage required.
  3. Divide this number by 1,000 to convert to kilowatts.
  4. Look up the kilowatts-per-hour rate from the local power utility company.
  5. Multiply the kilowatts by the kilowatt rate. This gives you the cost-per-hour of usage for the snow melting system.

EXAMPLE for heating an 800 square foot driveway:
800 (sq.ft.) x 37 (watts) = 29,600 (total watts).

29,600 divided by 1,000 = 29.6 kw per hour. (This is what the power company will charge you per one hour of operation.) The average utility rate is .12 cents, therefore: 29.6 x .12 = $3.55. The cost of operation would be $3.55 per hour.

The operating cost of an automated snow melting system is typically less than that of hiring a professional snow removal service. And radiant heat can help to extend the life of concrete driveways and keeps them from being subjected to abrasive snow removal methods or harsh snowmelt chemicals or salt. Safety is particularly important for business owners who wish to avoid costly litigation due to personal injuries caused by slick ice. For more information on driveway heating systems, call Warmzone today at 888.488.9276.

Other helpful, informative web pages:

  1. ClearZone snow melting
  2. Heated Driveways
  3. Installing a Heated Driveway
  4. Snow Melting System Installation Tips

Contractors Benefit from Working with Warmzone

Proven Radiant Heat Installers Gain Repeat Business from Warmzone

Warmzone Connects Experienced Contractors with Customers to Deliver Top-notch Radiant Heat Installations

As a contractor, are you interested in increasing your business? Are you looking for a radiant heat solutions provider you can trust? As a premier provider of radiant heat services, Warmzone has a longstanding reputation for connecting the best talent with their customers, generating more business for contractors, and greater peace of mind for consumers. So radiant heat installers benefit by partnering with Warmzone and customers benefit by having a proven, experienced contractor install their system.

Warmzone keeps track of radiant heat installers and their performance; thereby maintaining a map of the top independent installers throughout the country. This assists customers in identifying the most reputable professionals in their area to install radiant heat. Initially, professional builders teamed up with Warmzone because of its trusted products and unmatched customer support. Now, knowing that they can gain additional jobs adds even more incentive for installers and also benefits consumers as well. Currently, Warmzone can recommend preferred installers in virtually any region of the country.

Heated sidewalks being installed

Warmzone’s extensive catalog of proven products, awareness of current trends and profound industry knowledge currently supports a vast network of installers across the country. These resources provide impressive technical support, including complete system design and layout services, free installation training, “how-to” videos, and personal installation support. These resources are supplemented by the vast instructional documents and diagrams provided in Warmzone’s library of system manuals and technical guides residing on Warmzone’s website. Installers can put this wealth of online information to work for them and allow them to install radiant heat systems with confidence.

In addition to the online information, customers can utilize Warmzone’s free consulting services so they can make the best decision when it comes to purchasing and installing a radiant heat system. Warmzone is more than a provider of radiant heat – Warmzone is a partner that is committed to offering the best customer service in the business. We are determined to see that your snow melting, roof heating or floor heating system is installed properly and performing as expected.

Applying hot asphalt over heat cable mats

Contractors and installers have come to particularly appreciate Warmzone’s free installation training courses. Here a radiant heat expert covers all the aspects of installing a radiant heat system. Again, this benefits the installer and the customer. If the installer still encounters any questions during the installation process, he can speak to one of our dedicated support staff to assure that the installation goes off without a hitch. Installers are never left out in the cold when they work with Warmzone. Our goal, of course, is to give construction professionals the resources and the confidence they need to add radiant heat installation to their menu of services and provide the best service to our customers.

When it comes to all things radiant heat, Warmzone is the perfect partner. If you’re a contractor, it’s a great time to team up with professionals who have your back, and improve your bottom line. As a homeowner, you’ll enjoy peace of mind knowing you have a trusted installer and team of experts working for you. To learn more, call Warmzone at 888.488.9276.


Visit Warmzone.com for all things Radiant Heat

If you’re currently contemplating a radiant heat solution for your home, Warmzone can help you stay on top of your radiant heat installation with a comprehensive library of online resources. Whether you choose to purchase that top shelf solution from your local big box hardware store, or enlist our help, these online resources are absolutely free and available whenever you need them.

Rather than mucking blindly through a home improved project, it is the informed consumer that makes the best decision. And keep in mind: a radiant heat system is only as good as its installation, so it pays to work with a professional who will walk you through the entire purchase and installation process.

The prospect of researching a radiant heat project can be overwhelming if you don’t know where to look. Warmzone.com takes a deep dive into all aspects of radiant heat, allowing you to research and compare systems efficiently, including individual components and applications. The site helps you begin the process of discovering and weighing all of your options to help you make better decisions when you shop. It will also open you up to the realm of creative possibilities a radiant heat system home improvement project provides.

Beyond the initial shopping experience, we’ve made it easy for consumers by providing free consulting and an extensive library of online resources available whenever you need them. You’ll find high level overviews of radiant heat systems including their benefits, how they operate and current applications. You’ll discover an extensive archive of articles on a range of topics, as well as technical guides, installation videos, installation manuals and system component specs to suit your project needs. Here’s a sampling of the many topics you can expect to see the Warmzone archives:

In addition to this information, Warmzone offers instructional videos you can watch in real time to help you move through all aspects of a radiant heat project, whether you are installing a heated bathroom floor, a gutter-trace system or installing heat cable for your heated driveway.

Choosing Warmzone products yields big dividends for do-it-yourselfers and the most conscientious customers. By tapping a premiere provider, you benefit from the best in radiant heat technology and services available. Warmzone invests years of deep industry knowledge and experience into finding high-performing, cutting-edge radiant heat solutions for customers backed by impressive resources. Their professional design services team custom designs each radiant heat system to ensure it meets your project’s specific needs in terms of performance, installation complexity and price. You’ll know what to expect, every step of the way. Simply bring your creativity and budget requirements to Warmzone. Once you have a system design in place, our dedicated staff of experts are there to assist you throughout the purchase, design and installation process.

Whether you’re researching, shopping, or elbow-deep in an installation, you can call our technical support team or reference Warmzone.com, which is always available. We take pride in offering the most comprehensive library of information available on all-things radiant heat related to help make your project a success. Call today for more information: 888.488.9276.