Key Takeaways
Start with accurate measurements: Determine the square footage of the area to be heated. Warmzone can assist using satellite software or on-call support to ensure proper system sizing.
Custom system design matters: Warmzone provides detailed layouts considering your property, local climate, snowfall averages, and power needs to ensure optimal performance.
Check power availability: Verify your home’s voltage and amperage, either through a main breaker panel or with an electrician. Warmzone can guide you through these calculations to match system requirements.
Zoning solves power limitations: For properties with limited power, dividing the system into zones allows prioritized, sequential snow melting, making the system efficient and flexible.
Professional installation and support: Systems can be installed in asphalt, concrete, or pavers. Warmzone offers CAD designs, training, and ongoing tech support to ensure smooth installation and reliable operation.
Tips for Those Considering Radiant Heat
Purchasing a snow melting system like the ClearZone system offered at Warmzone is a great way to eliminate manual labor and make your home or business safer, but the process of finding, purchasing, and installing a system can seem complicated to any buyer. There are quite a few questions that can slow the purchasing and installation process. What products best suit my needs? How much power is required? How is my system installed? Here is a quick breakdown of the procedure to help you make a confident and informed decision.
One of the first things that needs to be addressed when installing a snow melting system is to determine the square footage of the area to be heated. A rough draft of the area you wish to heat is typically needed to begin the estimate and design of your radiant heat system. If you are unsure of the exact measurements or don’t know how to calculate the square footage of your driveway or area to be heated, contact Warmzone at 888.488.9276. With state-of-the-art software that allows for a satellite view of the property, a qualified Warmzone representative can measure the square footage for your project over the phone. Warmzone also offers professional design services to provide you with a detailed layout of your system. The custom layout takes all factors into consideration, including, the specifics of your property, the climate of your location, average yearly snowfall, and power requirements. Designing a custom system for you ensures that the best solution is provided and makes the installation of the heated driveway you’ve been imagining easy and painless.
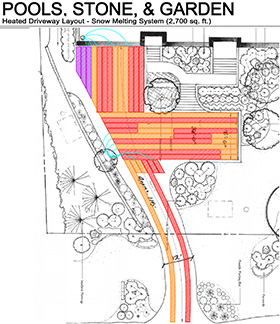
Example of radiant heated driveway system AutoCAD.
When it comes to power for your radiant heat system, here are few basic guidelines. It is important to verify the existing voltage (110/120 or 220/240) and available amperage. To make certain of your home’s power, we recommend having an electrician come to your location to measure the amperage. However, you can also check your home’s power by accessing your main breaker panel. Most homes are equipped with either two 100 amp panels or one 200 amp panel, which should be located at the top of the main breaker box. When figuring out what power your system may need, consider that one 30 amp breaker will heat about 170 square feet, so a 350-square-foot driveway would require one 60 amp breaker, or two 30 amp breakers. But don’t be intimidated by these details. Warmzone radiant heat experts will assist your electrician at any time to help ensure that all of your project information is correct prior to any installation taking place.
Most homes have more than ample power to operate a heated driveway or sidewalk(s). However, in the unlikely situation that there is limited power available, a technique called zoning can be used.
Zoning allows those with minimal power to still enjoy the benefits of a snow melting system. Your designated snow melting area is divided into zones, each with its own snow sensor. The zones are prioritized by which area must be cleared. Each zone operates separately, utilizing the available power to remove snow and ice from the designated area. This allows the system to optimize the available power. After the first zone is cleared power is sent to the next zone and so on, cycling much like a sprinkler system.
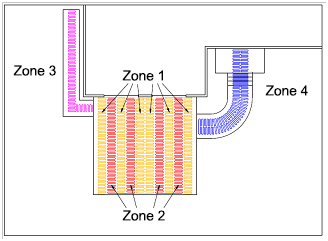
When faced with a limited power supply, snow melting systems can be installed to heat by zones, shown in this illustration.
At Warmzone, zoning is efficient and cost effective. The smart cycling features allow an area that may already be cleared to be skipped and not activated. Homeowners can also operate the system manually. If you have any questions about power, a Warmzone representative would be happy to assist you and explain your options. To talk with a radiant heat expert, call 888.488.9276.
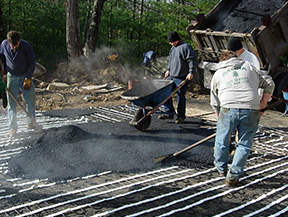
After verifying the voltage and available amperage of your home or business, you can move forward with the installation. Snow melting systems can be installed in almost any medium, whether it’s asphalt, concrete, or pavers. After choosing and receiving your heating cable and other system components, it’s time to prepare the area for installation. Make sure the area is cleared of any rocks or debris that may damage the heating cable.
With concrete installations, a wire remesh is installed and the heating cable is secured to the mesh to ensure proper cable spacing and prevent shifting during pouring. Next, Mesh-Up plastic supports are installed to prevent the cable from sitting on the ground. Finally, an aerial mount snow sensor is installed, which activates when there is precipitation and temperature drops below the set point (usually 39°F). When installing system components make sure to follow building codes and advised installation methods. You can also check out some basic installation tips here or view some helpful installation videos.
Still have questions about snow melting systems? Take advantage of the many industry leading services available at Warmzone. Professional design and engineering services offered at Warmzone provide customers with product consultation as well as a detailed CAD of their system’s layout. This ensures system performance expectations are met and minimizes installation issues. Free Installation training through Warmzone University is offered online or in person, and free tech support from radiant heat experts and electricians is also available.
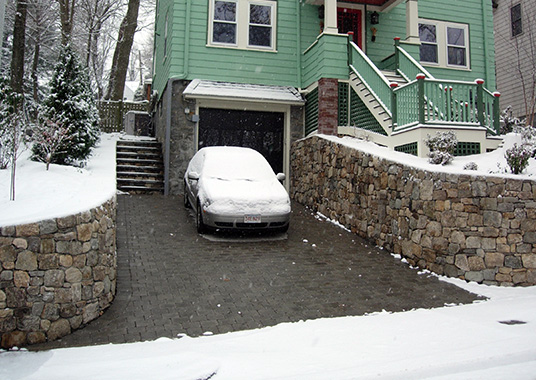
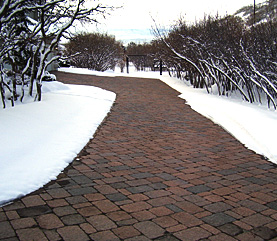
Example of a snow melting system in action.
Check out all the benefits Warmzone can offer by contacting a dedicated professional today at 888.488.9276.
FAQs
Are snow melting systems energy efficient?
Modern snow melting systems are designed to be energy-efficient, especially when paired with smart sensors and zoning technology. They only activate when needed, reducing electricity use while keeping driveways and walkways clear.
How long do snow melting systems typically last?
With proper installation and maintenance, snow melting systems can last 25–35 years in concrete or asphalt. Durable heating cables and reliable controls make them a long-term investment for safer, snow-free surfaces.
Can snow melting systems be retrofitted to existing driveways?
Yes, many systems can be retrofitted. While installation is easier during new construction, specialized techniques allow heating cables to be added to existing surfaces with minimal disruption.
Do snow melting systems require regular maintenance?
Snow melting systems are low-maintenance. Periodic inspections of cables, sensors, and control units ensure proper operation. Professional support is recommended if any issues arise, but most systems run trouble-free for decades.