
Introduction
This article is intended as a general guide to help users of snowmelt systems that utilize the ETO2 and ground sensor. For more detailed information, please refer to the Owner’s and Installation Manual.
The ETO2 is an electronic controller for fully automatic, economical ice and snow melting for outdoor areas. The controller is used for snow melting and roof deicing systems utilizing in-ground sensors.
The ETOG in-ground sensor detects both temperature and moisture and signals the controller when conditions warrant. The ETO2 unit then sends power to the cable, activating the snowmelt system and warming the driveway surface.
The ETO2 features an easily operated encoder button and backlit graphic display to ensure quick and easy configuration and simple indication of temperature, status, etc.

The control unit is suitable for controlling electric heating cables in a 1 or 2 zone system. It also features advanced two-stage output control for economic operation.
This article only covers some general startup and troubleshooting information for current owners. For installation instructions, please refer to the installation manual provided. (Available on our snowmelt product documentation web page.)
STARTUP
Turn the encoder knob on the front of the ETO2 to scroll through the available options.
Push the Encoder knob to “enter” your selection.
When the ETO2 is switched on for the first time, Celsius” or “Fahrenheit” must be selected. Turn the encoder knob until the required temperature scale is highlighted. Then OK the selection by depressing the encoder knob.
SENSOR 1 is shown on the display, allowing the type of sensor connected for input 1 to be selected. (ETOG ground sensor or ETOR gutter sensor and outdoor sensor.) OK the selection by depressing the encoder knob.
SENSOR 2 is then shown on the display, allowing the type of sensor connected for input 2 to be selected. If no sensor is connected for input 2, OFF must be selected.
OUTDOOR SENSOR: Select if outdoor sensor ETF is connected to terminals 31, 32. If no sensor ETF is connected, OFF must be selected. Press encoder knob for OK.
To select the application type, turn the encoder knob and then depress it.
ELECTRIC 1-ZONE:
ELECTRIC 2-ZONE:
ELECTRIC 2-STEP:
Select the appropriate option and press OK. The system is now set up, and will begin operating fully automatically, in accordance with the pre-configured standard program, see FACTORY SETTINGS. Alternative settings can also be made, see SETTINGS.
Status and afterheat data for zones 1 and 2 are now shown on the display.
OPERATION
The ETO2 is equipped with an easily operated encoder knob/button (turn and press) and a display which describes the current situation. The display is backlit and illuminated by pressing the encoder knob. The illumination is automatically switched off after 30 seconds.
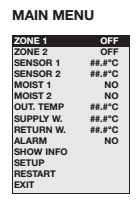
Press the encoder knob and the Main Menu will be displayed. Turn the knob to scroll through the options. Not all the options are shown on the display at once, but they can be accessed by turning the encoder knob. Press OK to select a highlighted option.
SETTINGS
Please note that incorrect sensor setup may lead to poor or lacking ice and snow melting. Press OK and a submenu will be shown on the display. Select the parameter to be set and press OK.
SETUP
FORCE HEAT – OFF Manual start of forced heat. Press OK and select ON to start Forced heat. ETO2 controller will heat in the pre-programmed AFTERRUN time, see AFTERRUN 1 and 2.
SELECT SCALE C – Whether temperature is to be displayed in Celsius (C) or Fahrenheit (F) can be selected here. Select the required scale and press OK. Press OK to return to the SETUP menu.
RESTART
When changing the settings or require a new process start, the ETO2 can be restarted in this menu.
OFFSET CALIBRATION
Restart operation. Keeping your current settings. The ETO2 will go to the initial status display. If it is necessary to calibrate the temperature measured by the ETOG sensor, please follow the steps below:
- Disconnect the sensor from terminals 11 and 12 (sensor heating) of the ETO2.
- Wait a few hours until the sensor has acquired the same temperature as the ground.
- Measure the real ground/sensor temperature and compare it with the temperature shown on the ETO2 display.
- Program the offset for the sensor concerned to match the difference between the two temperatures (displayed/real). Adjust the necessary offset using the encoder button. Press OK.
- Reconnect the sensor to terminals 11 and 12 of the ETO2.
NOTE: With ETOG-55 sensor, the temperature shown on the ETO2 display is always the core temperature of the sensor.
TROUBLESHOOTING
By errors in the snow melting system, it is recommendable to check the setup of the ETO2. Activate the menu by pressing the adjustment knob, press SHOW INFO and readout the programmed application. By errors in the setup, activate REINSTALL with factory code 1202.
Check that all connections are placed correctly, and that cables are fastened in the clamps. For more information, contact our technical support department 801.948.7545.
| PROBLEM | ACTION / POSSIBLE CAUSE |
| Display shows HEAT ON in zone 1 / 2 but the snow is not melting: | Wait 1-2 hours.
Check under the snow, if the snow is beginning to melt the system is OK. Check the heating cables for defects or bad connections. It is too cold for snow melting (power/m2) or undersized heating cables/ hydronic heating system. |
| Display does not show HEAT ON in zone 1 / 2 | The temperature is higher than SET TEMP. Adjust SET TEMP to higher temperature.
The snow around the ground sensor is melting/drifting snow has exposed the sensor. AFTERRUN time must be increased. Alternatively, FORCED HEAT can be activated. Igloo effect around the sensor. The ground sensor has melted an insulated hollow under the snow. Activate FORCED HEAT or, alternatively, set MOIST SENSOR to OFF. The temperature is lower than the OFF TEMP setting. Depending on dimensioning, the system has a lower temperature limit, at which the system can melt the snow. Try melting the snow with FORCE HEAT, before OFF TEMP is changed. |
| The heat does not shut off after ice/snow melting: | AFTERRUN time is too long – reduce AFTERRUN time and activate RESTART in the menu.
Moisture detection in the ETOG/ETOR sensor is turned off – set MOIST CTRL to ON in the menu. |
| If the ALARM button flashes red, one of the following errors has occurred. This can be displayed under the menu: ALARM. | |
| RETURN TEMP LOW | Water temperature on return pipe is too low. |
| SUPPLY TEMP HIGH | Water temperature on supply pipe is too high. |
| RETURN SENSOR | Return sensor defective. |
| SUPPLY SENSOR | Supply sensor defective. |
| TEMP SENSOR 1 | Temperature sensor in ground or roof sensor 1 defective. |
| TEMP SENSOR 2 | Temperature sensor in ground or roof sensor 1 defective. |
| OUTDOOR SENSOR | Outdoor sensor defective. |
| SENSOR HEATER | Short circuit of heating element in ground or roof sensor. |
| FROST PROTECT | Active frost protection due to low return temperature (water based systems only) |
 The heat will stay on the amount of time the designated in the AFTERRUN mode. Once the FORCE HEAT cycle is complete, the device will default back to AUTOMATIC mode. The falling snow will then keep the system on.