Tag Archives: Snow melting system installation

September HotNews – Install the Best

Deal With Pros who Care About Your Installation

You’ve just made an investment in your property and purchased your first state-of-the-art radiant heat system from Warmzone, and you may be wondering, what comes next? Installation is the next step, and the most important when it comes to your new radiant heat system. While purchasing products like a ClearZone snow melting system or ComfortTile radiant heat system assures the quality of your components, the system cannot be effective if installed incorrectly. Without proper installation, your system will not run at optimum levels, which means you won’t see the results you want for your home or business. Customer satisfaction is a priority at Warmzone, which is why when you purchase a system from Warmzone you have access to all the tools and help needed to ensure a safe, proper installation. Warmzone’s commitment to customer service and installation support is unparalleled in the industry.

Heated paver driveway

The first benefit you receive when working with Warmzone is access to Warmzone’s free professional engineering and design services. This service will help ensure a proper installation as well as save time and money. When purchasing a radiant heat system from Warmzone, you will work with professionals who can answer all your questions and provide you with a personalized AutoCAD for your project. At Warmzone, a radiant heat expert will create your AutoCAD to the exact specifications needed for your project.  This allows for a complete design drawing that includes the system layout, projected performance, all materials needed, and power needs. If there are questions about any of the technical aspects of the system, such as number of breakers needed for your project, or the load calculations needed, you will find these on your AutoCAD, or you can contact a professional at Warmzone at anytime. This is an important step in the design process, but even more important for your installation. The information provided can help you or your installer with any questions that may come up to ensure your installation goes off without a hitch.

After you have received your system layout and are ready for install, there are a few important things that can be done to assure your installation goes smoothly. We recommend that the installer reviews some of the helpful online instructional videos. Warmzone also provides personal installation training. The installation course is provided for customers so they can complete installation as quickly and as smoothly as possible. There are installation courses available for all of Warmzone’s industry leading products, and helpful installation videos that cover a range of topics. Warmzone’s online training is invaluable for the proper installation of a radiant heat system. Warmzone can also connect you with a qualified installer for your project to further ensure that your system is installed correctly.

The next important step for installation is making sure to hire a licensed and reliable electrician. While you can complete much of the installation on your own, you must hire an electrician to complete the wiring for your project (for warranty purposes). An electrician can also verify the amperage available at your home, which will ensure your system will run efficiently and effectively. (This should be the first thing homeowners do.) Verifying the amperage with a qualified electrician and having one available to help finish the installation process will prevent future issues with your radiant heat system. If you have purchased with Warmzone, you know your components are top of the line- but it crucial to complete the installation with a verified electrician to ensure your components will function properly. At Warmzone, the experts know products are only as good as their installation, which is why customer service professionals are available at anytime to assist you during the installation, and can help you locate an experienced electrician for your project.

Heated driveway with four heated tire tracks

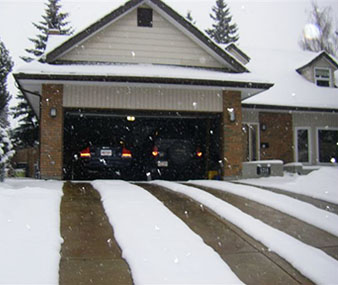
After you have completed your training and verified the amperage for your project with an electrician you can begin installation. For a heated driveway system, you will have the following components: a heating element (such as heating cable or mats), a control panel, and an activation device. An activation device is an aerial or pavement mounted sensor which detects temperature and precipitation to activate the system when needed.

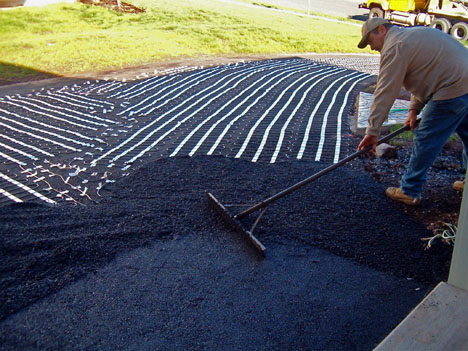
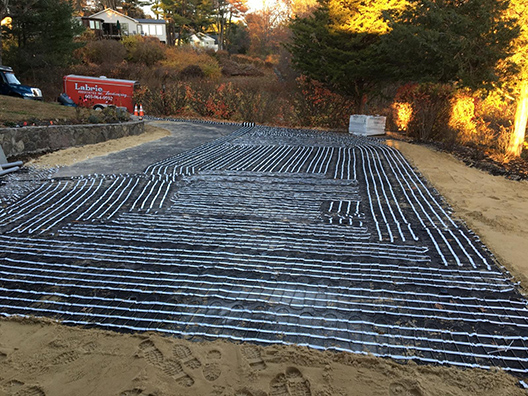
The first step in installation will be laying out your heating cable or mat. While this is not a hard process, there are a few important rules that must be followed. When installing, be sure to never cut or damage your cable. Cutting or compromising the heating cable or mats will ruin the product, and your system will not function. It is also critical when laying heating cable that the cables are not touching, and are spaced according to the layout (usually 3 or 4 inches apart). For heating concrete driveways and sidewalks, the cable must be secured to the remesh (with zip ties) that is supported by Mesh-Up plastic chairs for optimum performance. The Mesh-Ups keep the remesh and heat cable from being pushed down to the ground during the concrete pour. Ideally, the heat cable should be about 2 inches from the surface being heated. When the cable is installed it is important to test the cable during different phases of the installation and make sure it has not been damaged and is functioning properly (refer to installation manual).

You have some options when it comes to the snow sensor / activation device. You can install an aerial-mount activation device, typically mounted slightly above the roof line, or a ground-mount snow sensor that is placed in the pavement where it is exposed to the elements. The system is connected to the control panel, which is usually mounted on a wall in the garage. It is important to have a qualified electrician complete the wiring for your system. After this is done, you will be ready to use your new radiant heat system.

Warmzone’s customer service is available to you at anytime throughout the installation process. If you complete your online training and still have questions, you can access installation guides online. Professionals are also available to speak with and help you with any questions you may have, or you can check out our blog for tips on installation. When purchasing and installing radiant heat, Warmzone knows the importance of customer support and installation resources available for customers, making Warmzone a cut above in the radiant heat industry.

If you haven’t purchased a radiant heat system and are interested, please contact a Warmzone professional at 888-488-9276 and receive your free quote today.

June HotNews – The Importance of Proper Installation

Radiant heat has recently come into the spotlight as an efficient and cost friendly method to heat almost any area. It is a product for both businesses and consumers that allows safety, flexibility, and comfort. From interior applications like heated floors to snow melting systems like Warmzone’s industry leading ClearZone snow melting system, there are many ways a radiant heat system can improve your home or business in the cold winter months. Knowing how a radiant heat system works and what components are needed are some of the first steps in purchasing a system, but the most important aspect of the process is installation. That’s why Warmzone offers free installation training for installers.

Scissors and cable - Never cut the heat cable
Never cut the heat cable! To make turns, cut the white binding tape and arrange the cable accordingly.

Proper installation is crucial to ensure a radiant system functions safely and as intended. Proper installation also ensures the longevity and optimum performance of the system. Since the correct installation is so important, get started here with some information from the experts at Warmzone to help assure your installation goes smoothly.

A properly installed radiant heat system begins with the components. When installing radiant heat under flooring, a heating element is the first component needed. Warmzone’s ComfortTile heat cable is perfect for custom floor heating projects. The heat cable is available on spools or pre-spaced in easy-to-roll-out mats. These mats are simply rolled out and laid over the subflooring. Keep in mind that when installing the cable/mats, it is important that the cable is never cut or damaged.

Radiant floor heating systems are then controlled with programmable thermostats and a sensor for temperature control. After cables or mats have been laid out and secured, a licensed electrician must connect the wiring and complete your installation. (This is to ensure that your warranty remains valid.)

With Warmzone’s ComfortTile floor heating systems, superior components are standard. ComfortTile cable and mats are suitable for almost any flooring, and Warmzone’s programmable thermostats are designed specifically for radiant heat systems. They are simple to use and include an installation wizard for a quick and painless installation. A thermostat from Warmzone also allows for troubleshooting by exporting your information to the web for technical support.

Automated snow melting systems require heating cable, a contactor panel, and an aerial or in-ground sensor. These systems use the aerial or in-ground sensor to detect precipitation and temperature. When weather conditions warrant, the sensor triggers the system and power is sent to the heat cables. The system runs until the area is clear and then automatically shuts down. Aerial sensors are used for most home installations, while in-ground sensors are more often used for commercial applications. This makes an automated system a great way to save time, increase safety, and keep power costs low.

An automated snow meting system can require extra consideration when installing, so it is important to work with a provider that includes complete system design and layout services. This includes the proper materials and information necessary for the electrician, such as load calculations, breaker sizes and number of breakers. By working with Warmzone you’ll be completely prepared before any installation takes place.

The ClearZone snow melting system is a proven industry leader, and includes unrivaled installation support from Warmzone. These systems can be put into driveways, sidewalks, steps, loading ramps, or just about any area that needs to be heated. When choosing and installing a snow melting system, it is important to make certain that you are using high quality, versatile, and sturdy components. At Warmzone, ClearZone snow melting heat cable is also available on spools for custom configurations, or mats for larger areas.

Warmzone’s ClearZone snow melting heat cable is a twin conductor resistance heat cable that allows it to be installed into almost any medium. Special ClearZone cable is also available for installation in high temperature asphalt applications.

Installing a heated asphalt driveway

Great products will only work if an installation is done completely and properly. When laying out the cable for your system, it should be done carefully. Installers should be careful with the use of items such as metal rakes that may damage your cable. It is important once again to be sure you do not cut the cable, and the cables are spaced properly and never touching. (Generally, cables should be 3-4 inches apart, depending on your system.) The cables must be properly secured to the remesh as well.

To keep the cable from resting on the ground, place MeshUps plastic chairs under the remesh. These supports keep the cable off the ground during concrete pours and ideally, keeps the cable 2 inches from the surface being heated. This step prevents suboptimal performance and will help maintain the soundness of the cable in your snow melting system. If your cables are touching or not installed appropriately it can ruin the cable and make your system inoperable. Another important way to avoid an inoperable system is to test your cables when you receive them, as well as throughout installation.

When installing your aerial sensor, it is important for proper functioning that the sensor is unobstructed from the weather, so it can accurately detect temperature and precipitation. After installing your snow melting system or any radiant heat system purchased from Warmzone, fill out your warranty card. This is a step that many customers forget.

A snowmelt system can be installed by anyone, but the value of installation training and support is immeasurable in helping to avoid confusion and mistakes while installing. Warmzone is the industry leader in installation support. Not only can you or your installer contact a Warmzone professional at 888-488-9276 at anytime, you will also have access to other industry leading installation help that can make your installation quick and simple. With Warmzone’s professional design services, you can receive a detailed AutoCAD, which includes all the details of your system, from layout, to the power requirements, and all of the technical specs. It helps to ensure the proper installation of your system.

If you have questions about your components or system layout, Warmzone has technical support experts on staff ready to help. Warmzone also has videos and general installation overviews available. Technical guides and installation manuals are also available online.

If you are more interested in training prior to installation, check out Warmzone University. Warmzone university is completely free and has personal installation training that you can complete online with your instructor. You can also take the training in person at Warmzone’s office in Salt Lake City, Utah. An installation expert is also available to speak to at anytime at Warmzone, or if you need an electrician or contractor to help with installation, Warmzone can connect you with one in your area.

Warmzone understands the importance of installation and has the options to make sure your system is installed correctly. Check out Warmzone’s industry leading services. If you’re interested in a free quote or have other questions, contact a professional today at 888-488-9276.

Pre-Installation Checklist

Radiant Heat Experts Offer Key Advise and Tips on What NOT to do When Installing Radiant Heat

Radiant heat systems work. It’s a proven technology that produces impressive results. But like most technology related products, if a radiant heat system isn’t installed correctly, the results can be equally disappointing. Installing a radiant heat system is not difficult, but it does need to be done properly. You can buy the best snow melting system components on the market, but unless they’re installed correctly, you won’t see the results you’re expecting.

Recently named “Vendor of the Year” by the National Association of Custom Home Builders, Warmzone is a proven and trusted industry-leading provider of radiant heated driveways, heated floors and roof deicing systems. The company achieved its position by not only offering superior products, but by including the industry’s most comprehensive customer support services, including free installation training, technical support, and system design. These unparalleled services distinguish Warmzone from the competition, and have set the gold standard for all radiant heat providers.

“Our products not only work, but they’re among the industry’s best,” stated Bryan Morris, Director of National Sales for Warmzone. “But unless installers follow a few simple guidelines and install these systems correctly, the quality of the materials will make little difference.”

Installing a heated paver driveway.

Some of the most common installation mistakes include:

  1. IMPROPER CABLE SPACING. Too often, installers neglect to follow the cable spacing rules: Keep the cable at a minimum spacing of 2 inches and a maximum of 4 inches (center-to-center). Make sure the cable in adjacent mats is at least 2 inches apart.
  2. IMPROPER CABLE DEPTH. In concrete applications, many times installers allow the heat cable to rest on the dirt prior to the concrete pour. (Invest in Mesh-Ups. These plastic support ‘chairs’ are extremely affordable, and they can make all the difference in the world between a successful and an unsuccessful installation.) Mesh-Ups elevate the re-mesh (and heat cable) so that it is not resting on the ground when the concrete is poured. It’s a simple, affordable solution to prevent poor snow melting system performance, not to mention unhappy customers.
  3. NEGLECTED WARRANTY CARD. Too many installers forget to fill out the warranty card and mail it to the manufacturer. Don’t let this happen.
  4. FORGETTING TO TEST THE CABLE. Too many installers forget to test the cable during all phases of the installation. Start by testing the cable out of the box and then throughout the installation.
  5. COMPROMISED HEAT CABLE. Maintain the cable integrity by never cutting the cable, and take extreme caution when using shovels and rakes during concrete pours.

One way to limit mistakes during an installation is not only to avoid the above errors, but to follow the handy checklist below, put together by Warmzone’s experienced support staff:

PRE-INSTALLATION CHECKLIST

Before buying and installing a radiant heat system, review the checklist below.

  • Verify the correct voltage of your home or business (220/240 or 110/120).
  • Verify the available amperage. Don’t guess or assume. You’ll need to be certain, so we recommend having an electrician come to your location to measure the amperage.
  • Do your homework before hiring an electrician. Let’s face it, not everyone is competent or ethical. Preferably, find one who has been in business for several years. Ask around and talk with those who have personal experience with electricians.
  • Keep in mind that the National Electric Code (NEC) requires that the system has 30mA GFEP (30mA trip protection).
  • Make sure the installer has completed Warmzone’s free installation training course.

After installing your radiant heat system, fill out and mail your warranty card.

Perhaps the most overlooked tip – and one that can eliminate installation mistakes and unhappy customers – is to take advantage of the free training!  Call 801.948.7577 or 888.488.9276 to sign up or learn more.


Part II: Stories from the Support Desk

Learn From Your Mistakes

Installation Support Experts Reveal Some Unfortunate Installer Mistakes

While most mistakes can be remedied, it is – of course – much easier to simply do the job right the first time. Here are some stories of past installation blunders that could have easily been avoided:

Installation #1:  DON’T CUT THE CORD!

Instead of starting the cable installation as close as possible to the electrical source, one installer began running the cable from the terminated end. After laying out the cable, he discovered that he had about 60 extra feet of heat cable – including the splice to the cold lead. He cut the excess cable and then ran the heat cable (from the terminated end) directly into the ETO2 control unit!

Scissors and cable - Never cut the heat cable
Never cut the heat cable! To make turns, cut the white binding tape and arrange the cable accordingly.

Needless to say, this presented a significant fire hazard, not to mention that the entire system was now inoperable. This disaster could have been easily prevented with a few minutes of consulting with one of our support staff, or by completing one of our installation training courses.”

Installation #2:  SPACED OUT

Many installation problems are a result of improper spacing of the heat cable. And while mats come with the cable pre-spaced, the adjacent mats still must be spaced no less than 2 inches apart. The photo below shows how one installer laid out the cable and then applied the concrete pour. Instead of cutting the white binding tape to make turns with the mats, the cable was simply ‘serpentined’ all across the driveway; overlapping and bunching up and so on.

Example of incorrect layout of snow melting heat cable.
Example of incorrectly laid out heat cable for heated driveway. Cable must not touch or overlap. Always follow the installation guidelines regarding the correct layout of the heat cable.
Correct layout of heat cable
Example of heat cable (in mats) laid out correctly for a heated paver driveway.

Again, this could have been avoided by making a simple call to Warmzone, viewing one of our installation videos online, or completing an installation training course. Instead, the concrete had to be dug up and the system replaced. Don’t have time to take the 45-minute installation training course? Think again.”

“Mistakes like these shouldn’t happen,”  Morris emphasized. “Installers can complete a simple installation training course prior to installing the system, and they can always call a member of our support staff if they have any questions during the installation. If they do either of these things, then they’re likely to save themselves a lot of stress.”

Don’t Forget:

Test the heat cable during the installation and record the readings in the fields provided on the warranty card. After installing your radiant heat system, complete and mail your warranty card.

Double check your cable spacing. (Minimum spacing of 2 inches and a maximum spacing of 4 inches.)

Perhaps the tip that can most effectively eliminate installation mistakes and unhappy customers is this: Take advantage of the free training!