
Warmzone Countertop Heaters with FeelsWarm Technology – Installation Guide
Download the Countertop Heaters Installation Manual (PDF)
Download the Countertop Heaters Installation Manual (PDF)
Even though spring is just rubbing its eyes and beginning to stir, this is actually a great time to prepare for the next winter by installing a radiant heat system. Early bird discounts may apply to self-regulating roof deicing systems as well as ClearZone snow melting systems.
Installing a heated driveway or snow melting system in early spring puts you at a distinct advantage versus installing one later in the year. During the summer “construction season”, contractors are often unable to complete all of their projects. So, when fall comes, builders compete to purchase the necessary products to complete as many projects as possible – and the availability of dependable contractors may be limited. However, finding a contractor before the fall rush allows you to take your time interviewing and selecting the professional you deem best for your project.
In terms of finding the best installer for your radiant heat system, Warmzone also keeps track of experienced installers who have installed radiant heat systems successfully. And keep in mind, radiant heat applications are extremely flexible and adaptable, offering homeowners many options to achieve their goals, so don’t be fooled by expensive quotes with limited options.
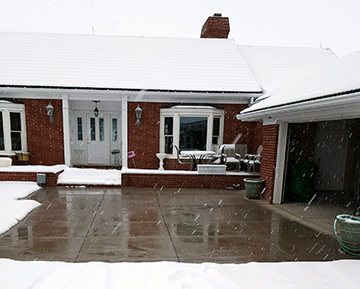
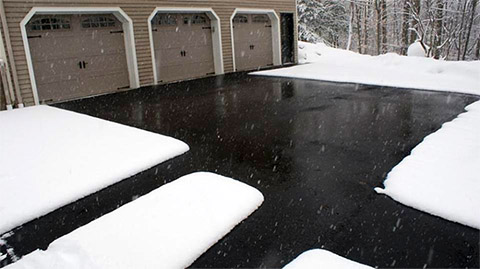
Whether you’re pouring new concrete or repairing existing pavement, radiant heat installation is an excellent home investment that not only preserves and protects your property, but also helps to prevent slip and fall accidents, as well as injuries from shoveling. Snow melting systems can also save you the time, and eliminates the added expense of hiring a snow removal professional to plow your driveway. With radiant heated driveways and walkways, you get fully automated snow removal, and the opportunity to experience dry pavement all year round. And the fully automated systems operate silently on renewable energy.
In addition to providing industry leading snow melting, roof deicing and floor heating solutions, Warmzone’s customer services are unmatched. Each and every radiant heat solution you purchase from Warmzone comes with a professional consultation, including an AutoCAD system design, so you’ll know the proper layout and materials, proper load calculations, breaker sizes, number of breakers, and performance expectations for your project prior to installation.
Free installation training courses are also provided by Warmzone. These services are second to none in the industry, and are included for each Warmzone customer. For more information about radiant heat systems, contact a friendly expert today at 888.488.9276.
Radiant Heat Experts Offer Key Advise and Tips on What NOT to do When Installing Radiant Heat
Radiant heat systems work. It’s a proven technology that produces impressive results. But like most technology related products, if a radiant heat system isn’t installed correctly, the results can be equally disappointing. Installing a radiant heat system is not difficult, but it does need to be done properly. You can buy the best snow melting system components on the market, but unless they’re installed correctly, you won’t see the results you’re expecting.
Recently named “Vendor of the Year” by the National Association of Custom Home Builders, Warmzone is a proven and trusted industry-leading provider of radiant heated driveways, heated floors and roof deicing systems. The company achieved its position by not only offering superior products, but by including the industry’s most comprehensive customer support services, including free installation training, technical support, and system design. These unparalleled services distinguish Warmzone from the competition, and have set the gold standard for all radiant heat providers.
“Our products not only work, but they’re among the industry’s best,” stated Bryan Morris, Director of National Sales for Warmzone. “But unless installers follow a few simple guidelines and install these systems correctly, the quality of the materials will make little difference.”
Some of the most common installation mistakes include:
One way to limit mistakes during an installation is not only to avoid the above errors, but to follow the handy checklist below, put together by Warmzone’s experienced support staff:
PRE-INSTALLATION CHECKLIST
Before buying and installing a radiant heat system, review the checklist below.
After installing your radiant heat system, fill out and mail your warranty card.
Perhaps the most overlooked tip – and one that can eliminate installation mistakes and unhappy customers – is to take advantage of the free training! Call 801.948.7577 or 888.488.9276 to sign up or learn more.
Learn From Your Mistakes
Installation Support Experts Reveal Some Unfortunate Installer Mistakes
While most mistakes can be remedied, it is – of course – much easier to simply do the job right the first time. Here are some stories of past installation blunders that could have easily been avoided:
Installation #1: DON’T CUT THE CORD!
“Instead of starting the cable installation as close as possible to the electrical source, one installer began running the cable from the terminated end. After laying out the cable, he discovered that he had about 60 extra feet of heat cable – including the splice to the cold lead. He cut the excess cable and then ran the heat cable (from the terminated end) directly into the ETO2 control unit!

Needless to say, this presented a significant fire hazard, not to mention that the entire system was now inoperable. This disaster could have been easily prevented with a few minutes of consulting with one of our support staff, or by completing one of our installation training courses.”
Installation #2: SPACED OUT
“Many installation problems are a result of improper spacing of the heat cable. And while mats come with the cable pre-spaced, the adjacent mats still must be spaced no less than 2 inches apart. The photo below shows how one installer laid out the cable and then applied the concrete pour. Instead of cutting the white binding tape to make turns with the mats, the cable was simply ‘serpentined’ all across the driveway; overlapping and bunching up and so on.


Again, this could have been avoided by making a simple call to Warmzone, viewing one of our installation videos online, or completing an installation training course. Instead, the concrete had to be dug up and the system replaced. Don’t have time to take the 45-minute installation training course? Think again.”
“Mistakes like these shouldn’t happen,” Morris emphasized. “Installers can complete a simple installation training course prior to installing the system, and they can always call a member of our support staff if they have any questions during the installation. If they do either of these things, then they’re likely to save themselves a lot of stress.”
Don’t Forget:
Test the heat cable during the installation and record the readings in the fields provided on the warranty card. After installing your radiant heat system, complete and mail your warranty card.
Double check your cable spacing. (Minimum spacing of 2 inches and a maximum spacing of 4 inches.)
Perhaps the tip that can most effectively eliminate installation mistakes and unhappy customers is this: Take advantage of the free training!
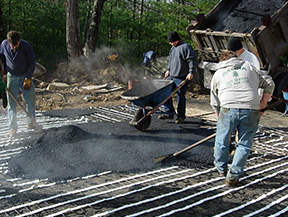
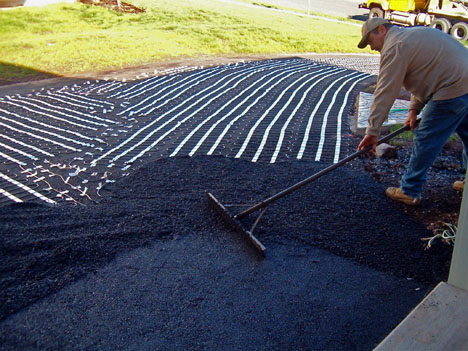
Installation Tips for Installing Snow Melting Heat Cable in Asphalt (Quick Reference Guide – Article 1 in a Series of 3)
Remember to check the element resistance and the insulation resistance of the heating cable/mat at the recommended intervals:
* This list is intended as a general quick reference guide. It is NOT a substitution for proper training and following the installation manual. Always read and follow the installation manual. Web-based training is available on request.
For more information about installing heated driveways and snow melting systems, visit Warmzone’s Installation Overviews web page. Warmzone also provides a host of radiant heat installation videos online as well. Call us today for more information at 888.488.9276.
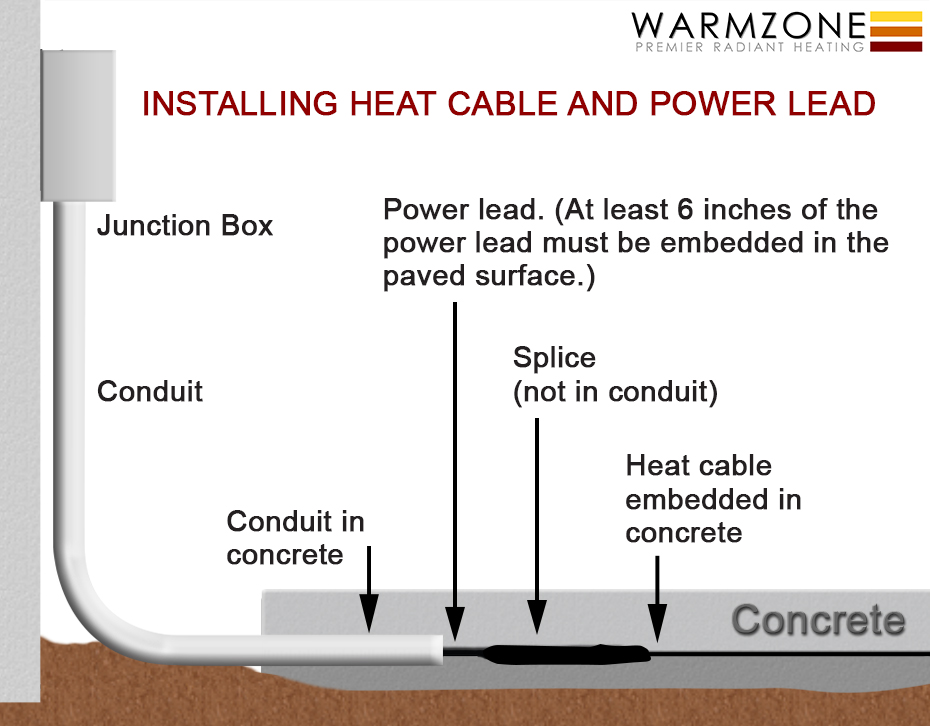
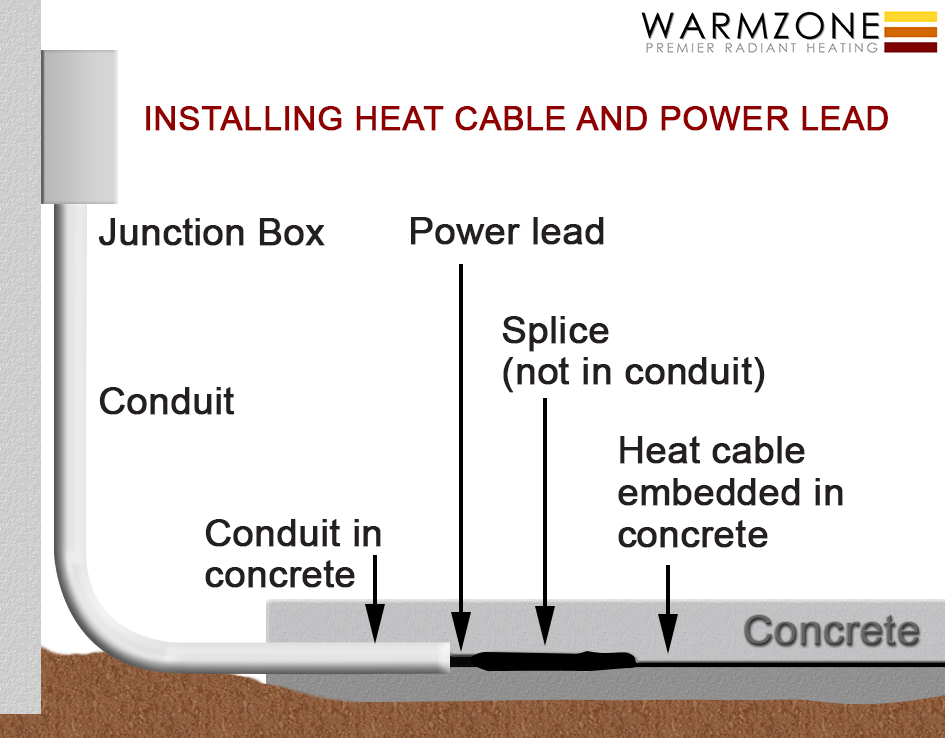
Installation Tips for Installing a Snow Melting System in Concrete (Quick Reference Guide – Article 2 in a Series of 3)
Remember to check the element resistance and the insulation resistance of the heating cable/mat at the recommended intervals:


* These tips are meant for quick reference. It is NOT a substitution for proper training and following the installation manual. Always read and follow the installation manual. Web-based training is available on request.
View Warmzone installation videos.
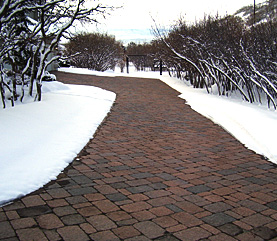
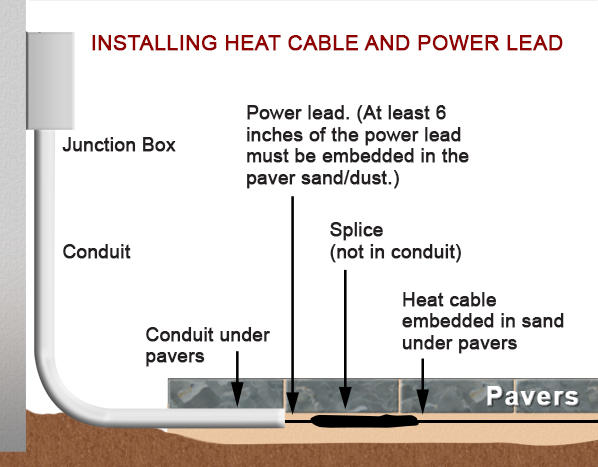
Installing Heat Cable under Pavers (Quick Reference Guide – Article 3 in a Series of 3)
Remember to check the element resistance and the insulation resistance of the heating cable/mat at the recommended intervals:
When laying out the cable, DO NOT allow heating cables to touch, cross, overlap or get bunched up. Minimum allowable spacing is 2 inches.
Begin installation as close as possible to the electrical source.
DO NOT cut or alter the heating cable. The white binding tape of heating mats may be cut in order to make turns with the mats, but the heat cable must never be cut or altered.
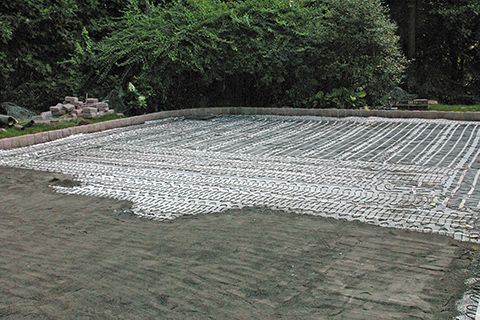
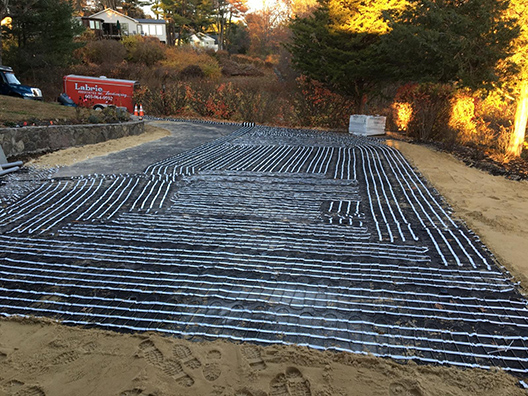
To secure the cable, lay down a piece of thin wire mesh that fits the area to be heated. The wire mesh should be secured to the ground (with landscaping staples or pins) so it will not move during the embedment process.
Roll out the heating cable or mat and secure it to the wire mesh or grid using plastic zip ties. Heating cables should be securely fastened so they do not move or shift during embedment.
Heating cable should be spaced at no less than 2-inches center-to-center and no more than 4-inches center-to-center. This also applies to the cables in adjacent heating mats.
Contact paver or block manufacturer for total sand or dust depth needed for proper paver/block installation.
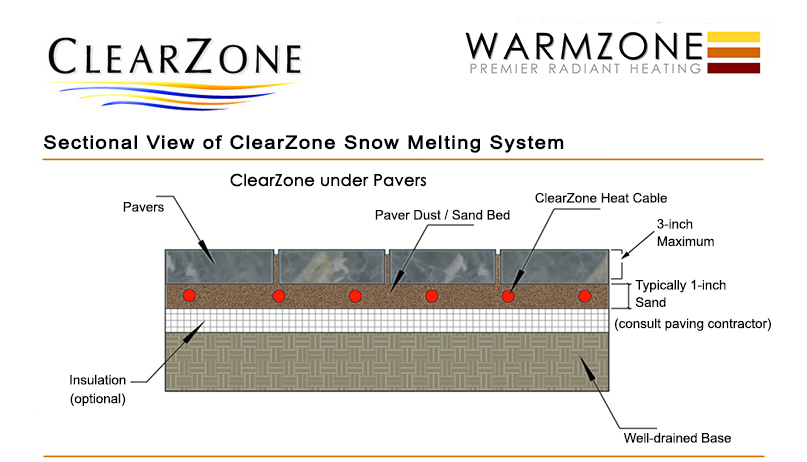
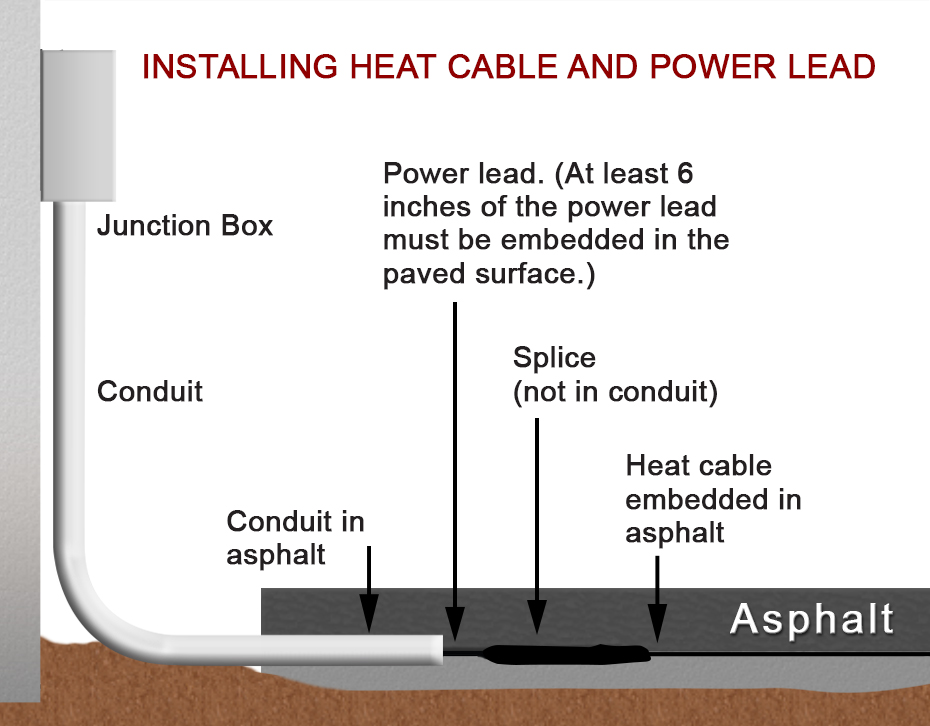
Embed all of the heating cable and the splice in a minimum of 1-inch (½-inch above and ½-inch below) of compacted material such as paver sand or stone dust. Cable and splice must be completely embedded. No air gaps around the cable or splice are allowable. Gauge of paver sand, stone dust or base material must be fine enough to completely encapsulate cable.
Do NOT drop pavers directly on the cable. (This can damage the cable insulation.) If this occurs, stop installation and check cable integrity via ohm reading.
Handle heating cables carefully – use extreme care with tools such as shovels, rakes and wheel barrels to avoid damaging the cables.
Verify cable integrity by checking resistance often during installation.
It is important that this equipment be installed by a licensed and qualified electrician and in accordance with local laws, codes, regulation and in accordance with NEC guidelines.
If installing in permeable pavers or with pavers or blocks greater than 3-inches thick, contact Warmzone BEFORE installing.
* This list is intended as a general quick reference guide. It is NOT a substitution for proper training and following the installation manual. Always read and follow the installation manual. Web-based training is available on request.
For more information about installing heated driveways and paver snowmelt systems, visit Warmzone’s Installation Overviews web page. Warmzone also provides a host of radiant heat installation videos online as well. Call us today for more information at 888.488.9276.
The Services and Resources to Look for When Considering the Installation of Radiant Heat
From the initial idea of adding radiant heat to your new or existing home to the actual purchase and installation can be somewhat intimidating for homeowners. Where do you start? What should you be looking for, and what are the options?
Judging from past customers, radiant heat is a proven, worthwhile investment that provides very efficient and luxurious warmth using clean renewable energy. Radiant heated floors continue to gain popularity because of their efficiency as well as the rich, comfortable heat that they produce.
Find a provider that includes complete system design services and a large selection of products and services – from different manufacturers. Warmzone is one provider that offers a dynamic range of radiant floor heating systems. Because of the diverse selection, Warmzone can evaluate your specific needs and recommend the system that will best meet your budget and heating demands. So, if you’re considering installing a heated floor, view Warmzone’s Floor Heating Overview web page to gain some general information about the different systems. Then call a Warmzone representative to discuss the various possibilities and the advantages of each system (888.488.9276). Our staff features experienced professionals who are happy to consult with prospective customers without any pushy sales pressure.

Warmzone includes professional installation support services.
And when it comes to customer service, you won’t find a provider that offers better customer services. Warmzone services include FREE installation training for installers, detailed system design and layout services, technical support, free consulting, and a wealth of online documentation, videos and information resources. We take pride in our unparalleled personal services as well as our industry leading products.
Warmzone snow melting systems are also among the very best available. Warmzone continues to be a leader in offering the latest technology with the most trusted and proven systems. Warmzone heated driveways and snow melting systems are easy to customize to match the budget and performance requirements of each customer.
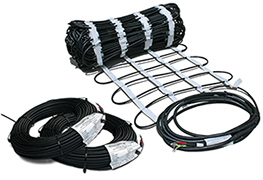
ClearZone heat cable is the longstanding backbone of Warmzone’s exceptional snow melting systems. In addition to the heating element, Warmzone driveway heating systems also feature a contactor panel/controller and either a ground-mount snow sensor or an aerial mount sensor. These advanced activation devices detect precipitation and temperature, so when conditions warrant, the sensor triggers the system and the driveway begins to heat. The system continues to operate for a short time after the storm to ensure that the driveway is dry, eliminating slick, dangerous ice.
Fully automated, energy efficient, and featuring quiet, clean operation, Warmzone snow melting systems continue to be a favorite among contractors and professional installers.
For more information, call us at 888.488.9276 and speak with a radiant heat consultant. Also take advantage of our online information resources and view radiant heat installation videos, monthly newsletters, product literature and more. We think that the more you research and compare radiant heat companies, the more impressed you’ll be with Warmzone. Call or email us today for a free quote.
Heated driveway systems are surefire ways to enhance safety for businesses located in cold weather climates. From grocery stores to restaurants and car washes, business owners are turning to radiant heat to ensure safety and protect themselves from liability claims.
Warmzone radiant heat systems are fully automated, so there’s no need for business owners to show up at the workplace early to shovel snow. The automated systems activate when an aerial or ground-mount snow sensor detects precipitation and temperatures are below a set point (typically 39°F). The energy efficient snow melting systems operate only when needed, and are also maintenance free – another favorite feature among business owners.
Easy to Customize
Radiant snow melting systems are easy to customize. Electric snowmelt systems can be installed to heat unique shapes and areas, and can be tailored to best meet the client’s budget needs. In addition to heating entire driveways and sidewalks, some other popular layout options for heating driveways include:
Heating tire tracks: Rather than heating an entire driveway, install two 24-inch wide heated tire tracks.

Heating the Center Strip or High Traffic Areas: Heat only an 8 or 10-foot wide strip up the middle of the driveway. Or install heat cable only in the most trafficked area of your driveway. Heat trouble spots such as inclines or where shade often causes ice buildup. Instead of heating an entire sidewalk, just warm a 3-foot wide strip in the middle; or heat the steps and heavily trafficked areas of entry points and porches. Businesses often install radiant heat to melt snow and ice in parking areas and walkways near the store front as well as in loading docks and ramps.
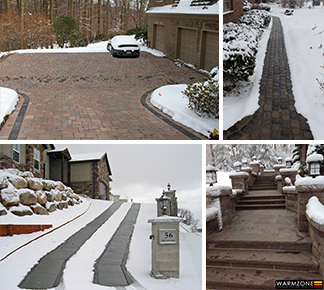
Heating specific/custom areas: Many consumers install radiant heat only for specific needs. For example, heat dog runs or kennels to keep outdoor pets comfortable, or only heat the sloped areas of a sidewalk or just the steps. The options are virtually limitless when it comes to installing heated driveways.

Visit Warmzone’s heated driveway web page for more detailed information. The information includes sections on how heated driveways work, determining the operating cost, how heated driveways work and more.
From small, custom snow melting projects to large commercial applications, radiant snow melting systems have proven to be the reliable, cost effective solution for homeowners and business owners alike.
Unlike other providers of radiant heat systems, Warmzone offers free installation training courses for installers, as well as complete system design and layout services and installation support. Dealing with Warmzone makes the process of finding and installing the best system easy for customers.
Information Resources: